Holiday Song Accompaniments!
This past Christmas, some children in our class made beautiful hand-bound books full of original percussion accompaniments (repetitive ostinati to be played while the songs are sung), which they composed to accompany famous holiday songs.
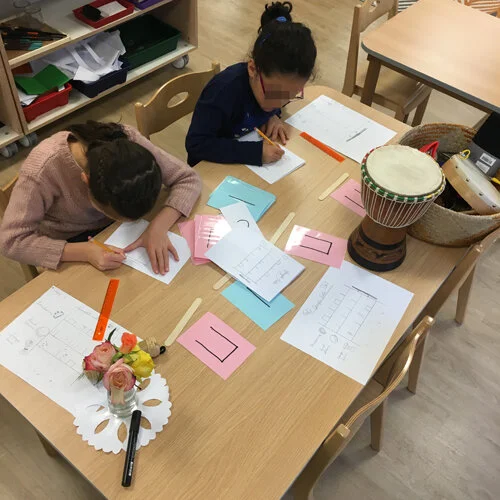
Children working with rhythm cards to compose their accompaniments.
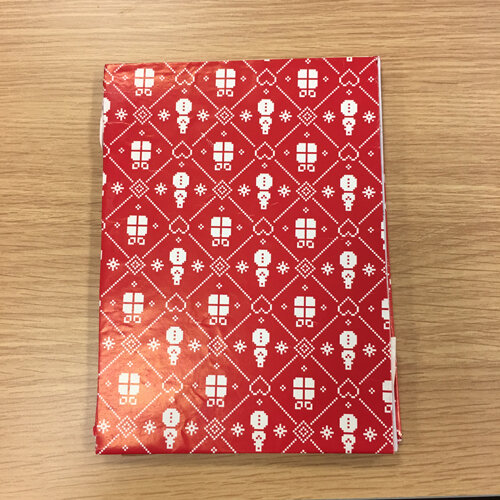
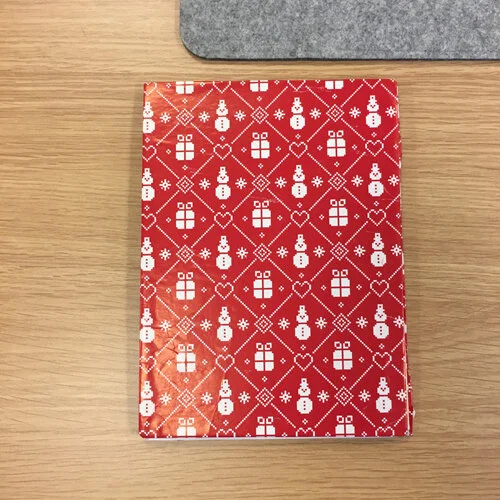
To make the cover, the children wrapped a piece of cardboard in holiday gift wrap. Then they bound the books using special sticky book-binding tape.
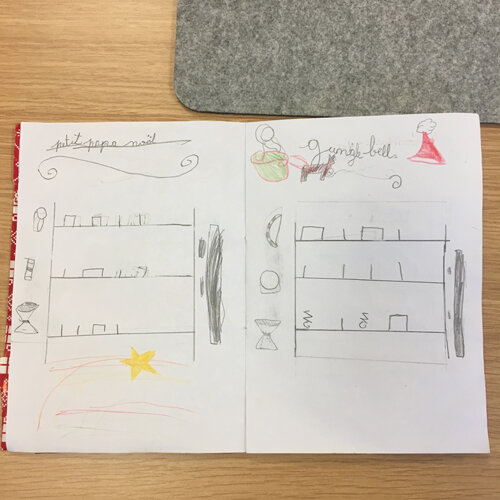
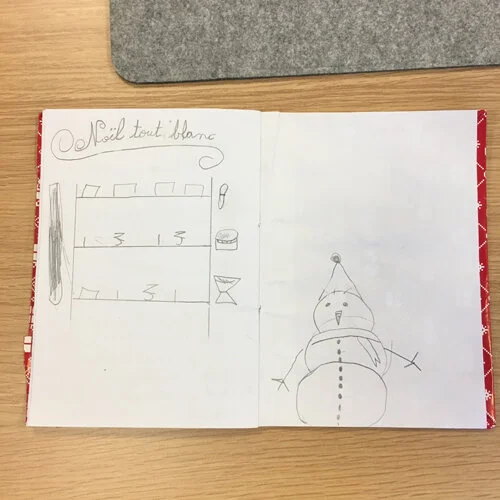
Below, you can see how the children wrote their miniature scores. They started by drawing the instruments on the left. The accompaniment on the right, “Gungle Bell” was written for tambourine, hand drum, and bongo drum. Each line next to the instrument is a percussion staff line. The music is read from left to right. The notes that line up vertically are played at the same time. That funny sign on the right is a repeat symbol.
Notice the colorful decorations. The photos that follow show only a few sample pages. The books ended up being actually quite thick and chock full of holiday songs.
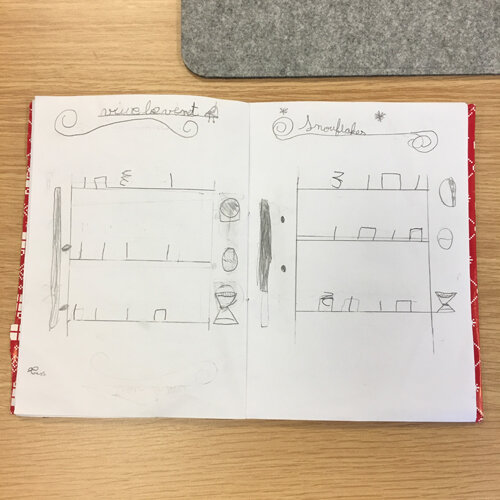
On the pages below, Tracy wrote her scores backwards. The repeat sign should be on the right and the instruments on the left. It’s still cute, though. Since these photos were taken, we’ve fixed the scores so the symbols are written the right way around.
Remind the children to leave room for drawings and illustrations in their music!
It’s worth noting that although Tracy used a very limited amount of rhythmic elements for her accompaniments—ta, ti-ti, and sh— when the children played these accompaniments while we sang Christmas songs, they sounded really nice.
This is just one example of how beautiful complexity arises from simple building blocks.
Symphony No. 1, "The Eight Universes", Part 2

Last Thursday, I posted about the symphony that a fourth- and fifth-year in our class are composing. (See the post dated May 30th, 2019).
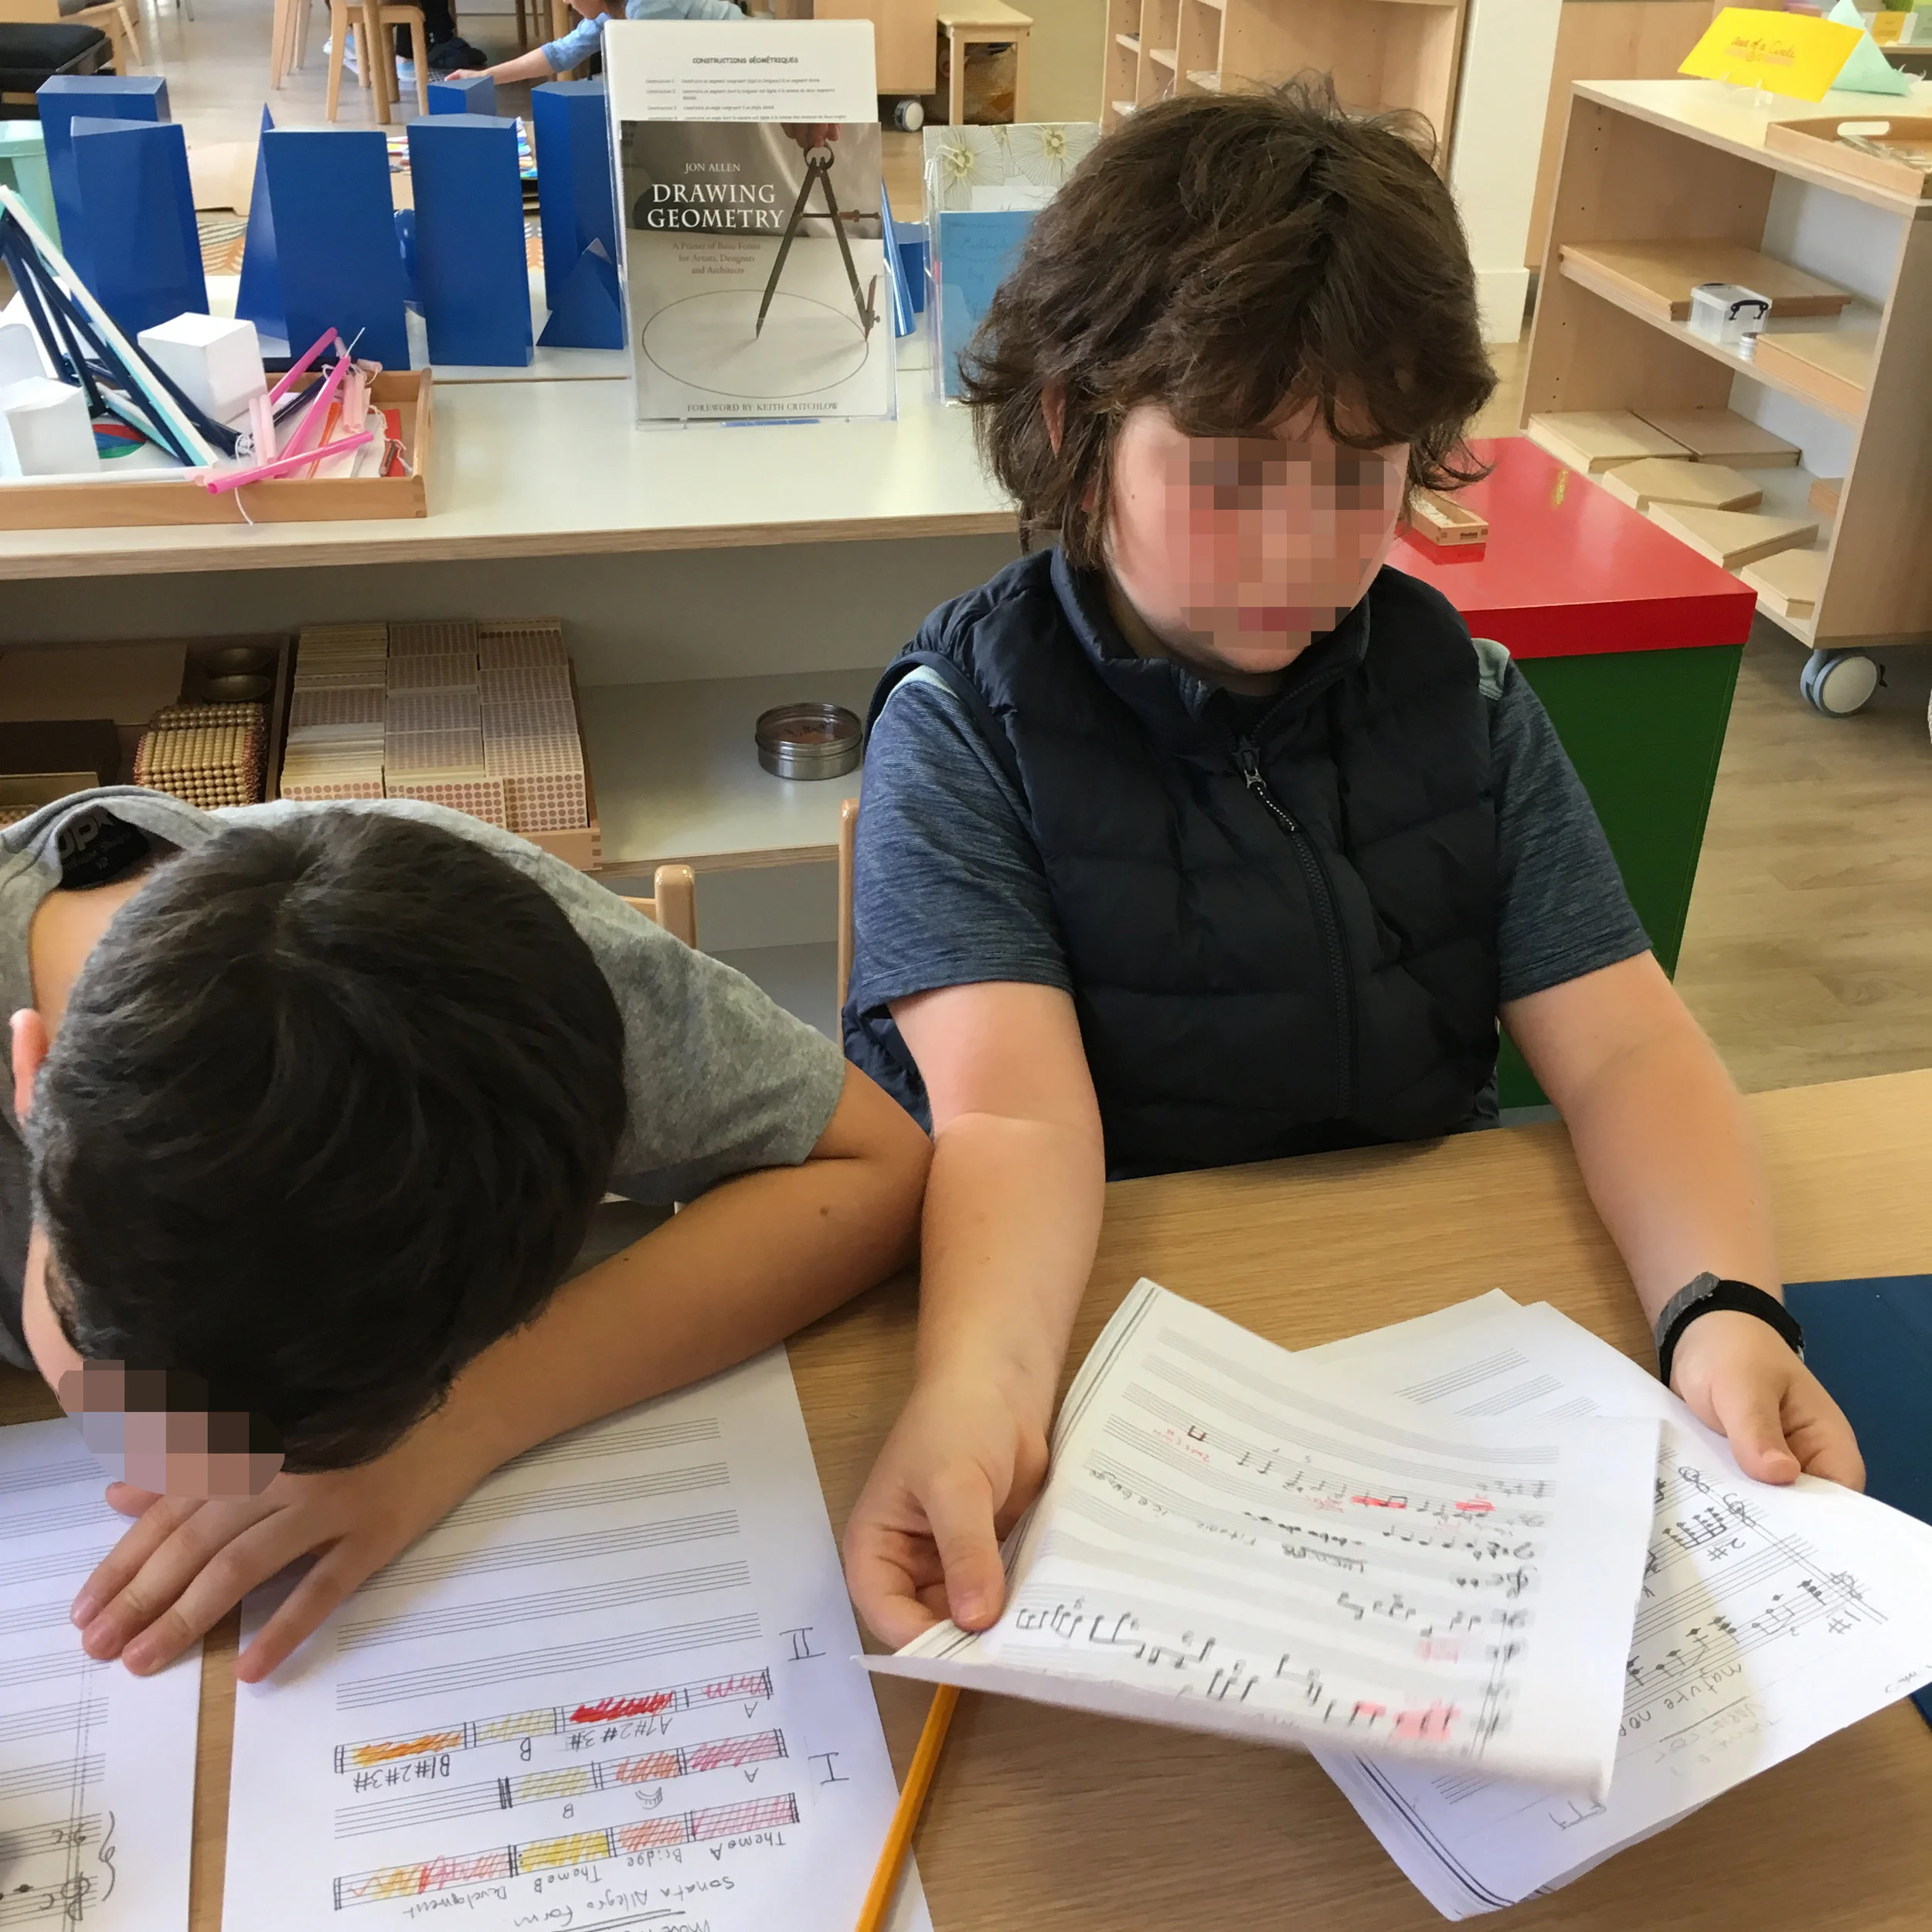
So, having written their two themes, their 3 variations on each theme, and their bridge, Sully and Christopher finished the music for the Exposition section of their sonata-allegro form. It was time today to make a working draft that contains all of the music they’ve written so far.
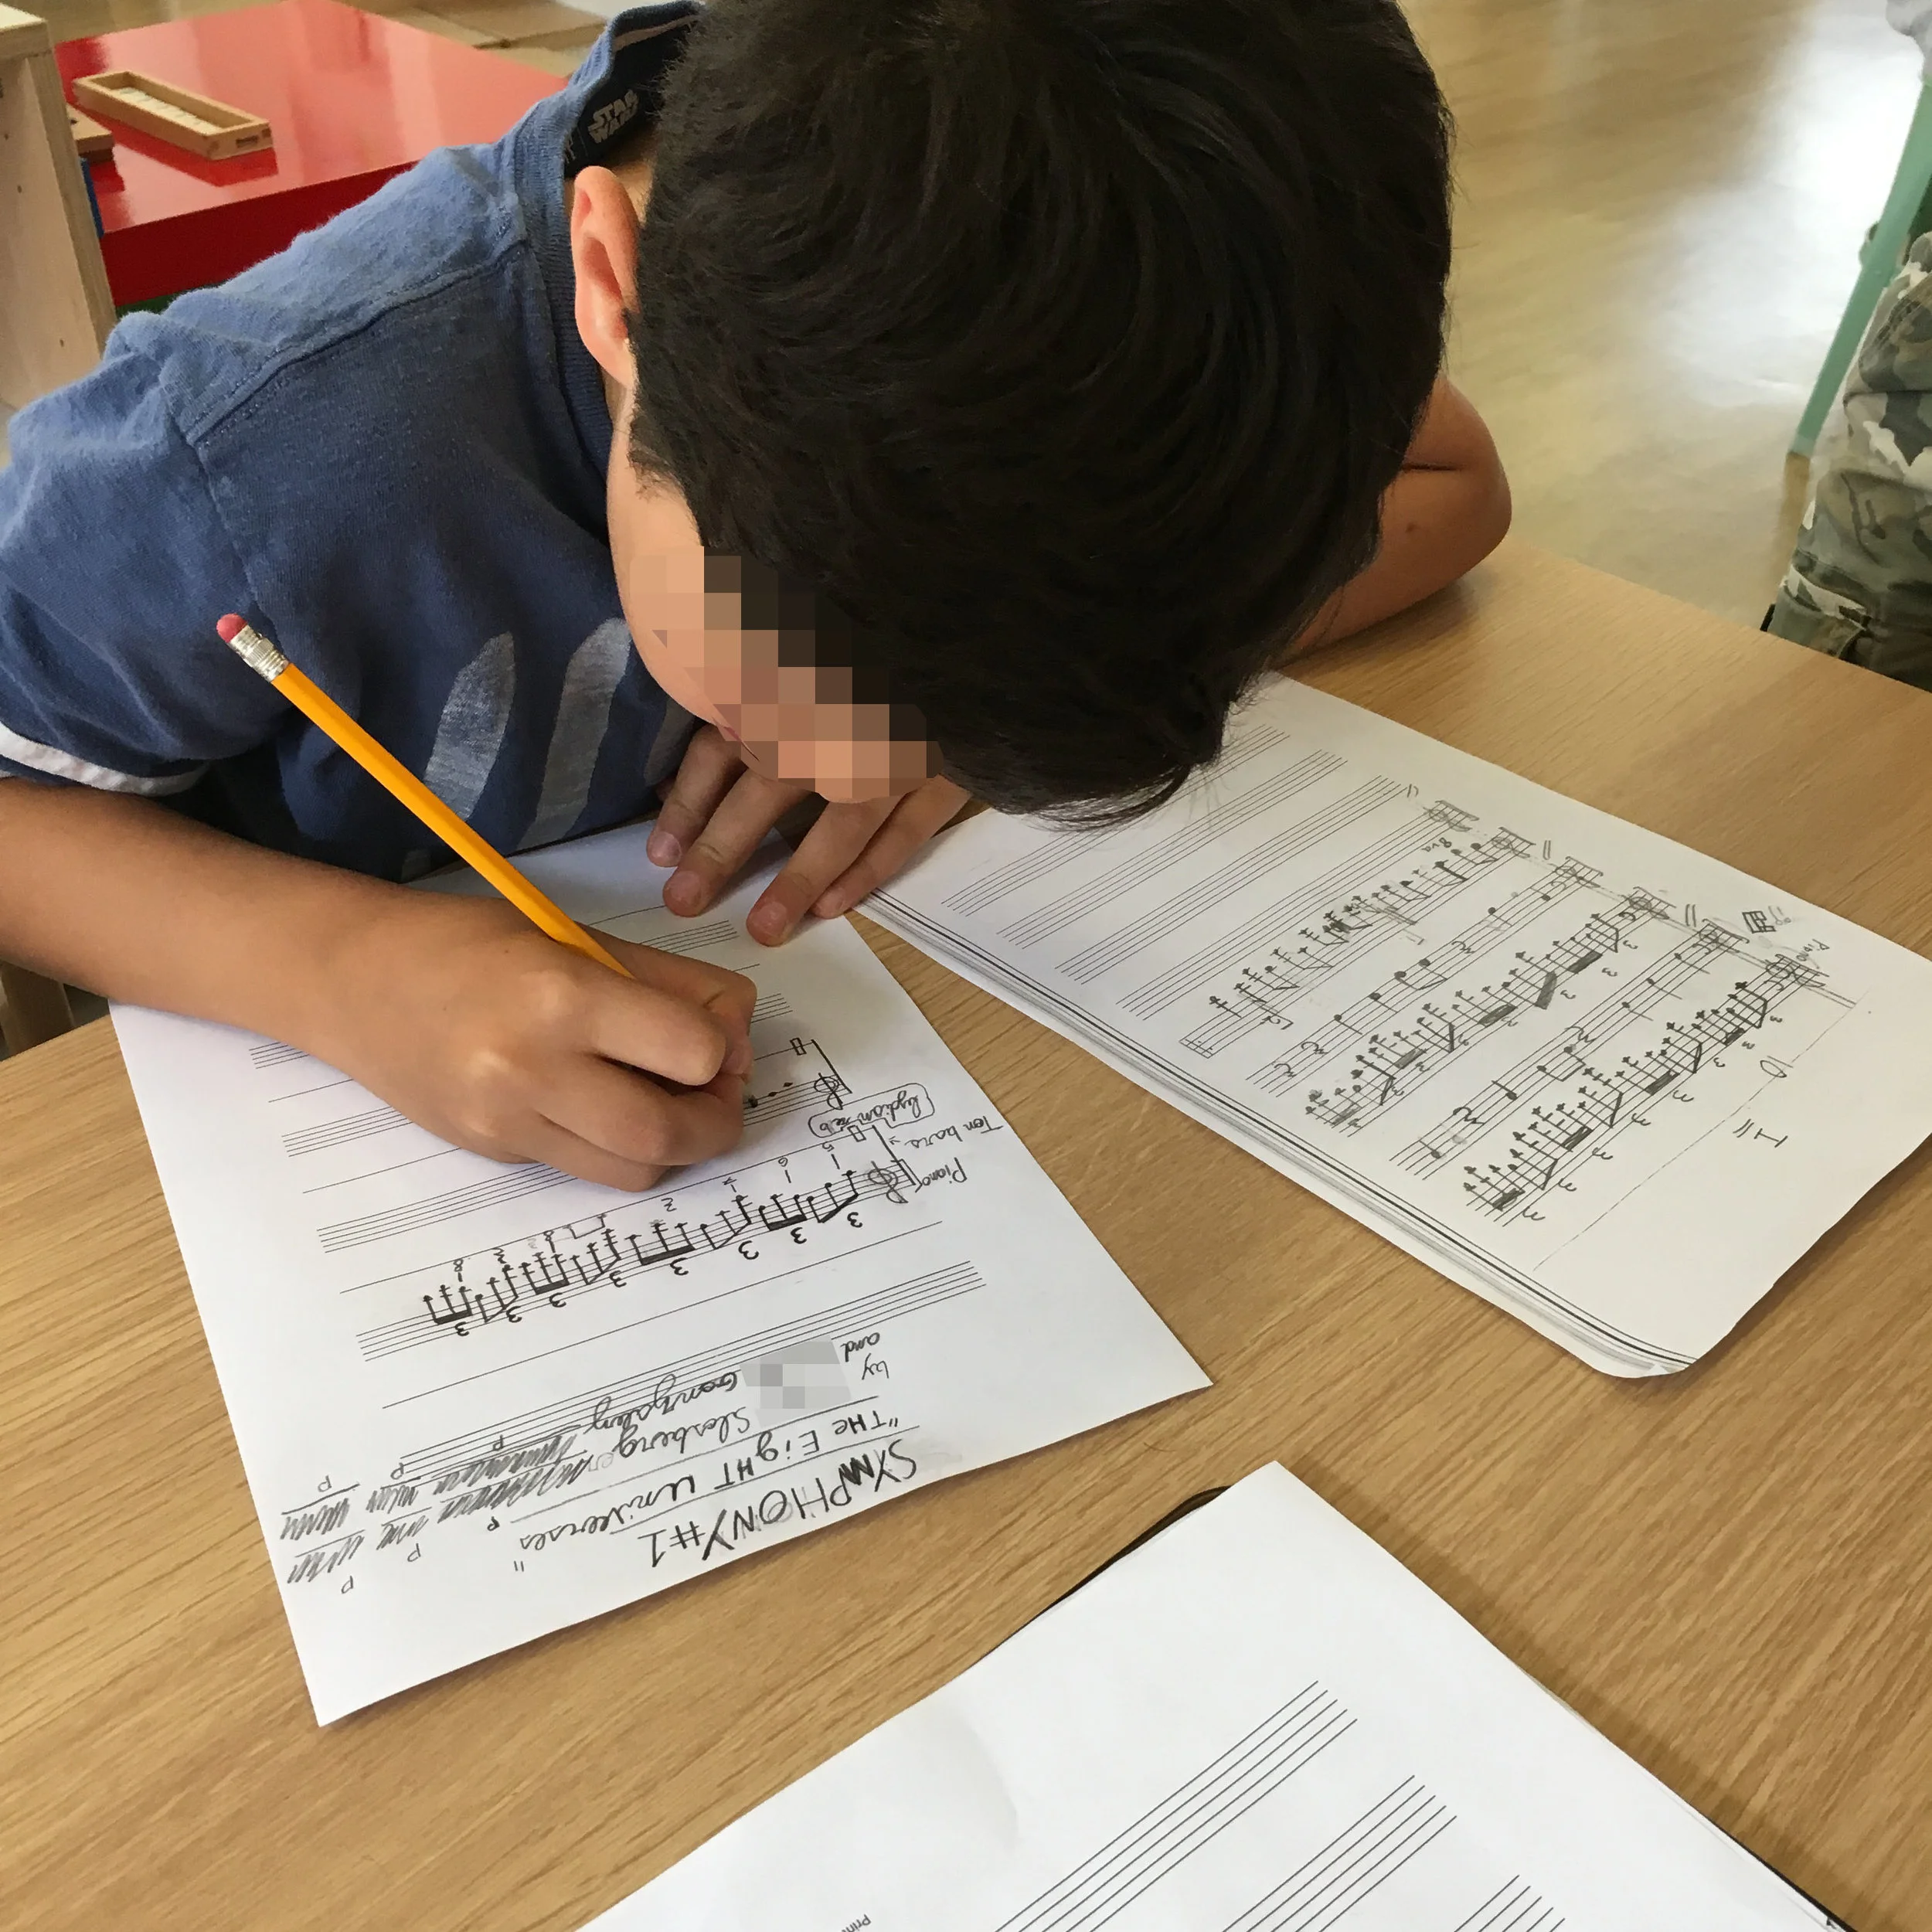
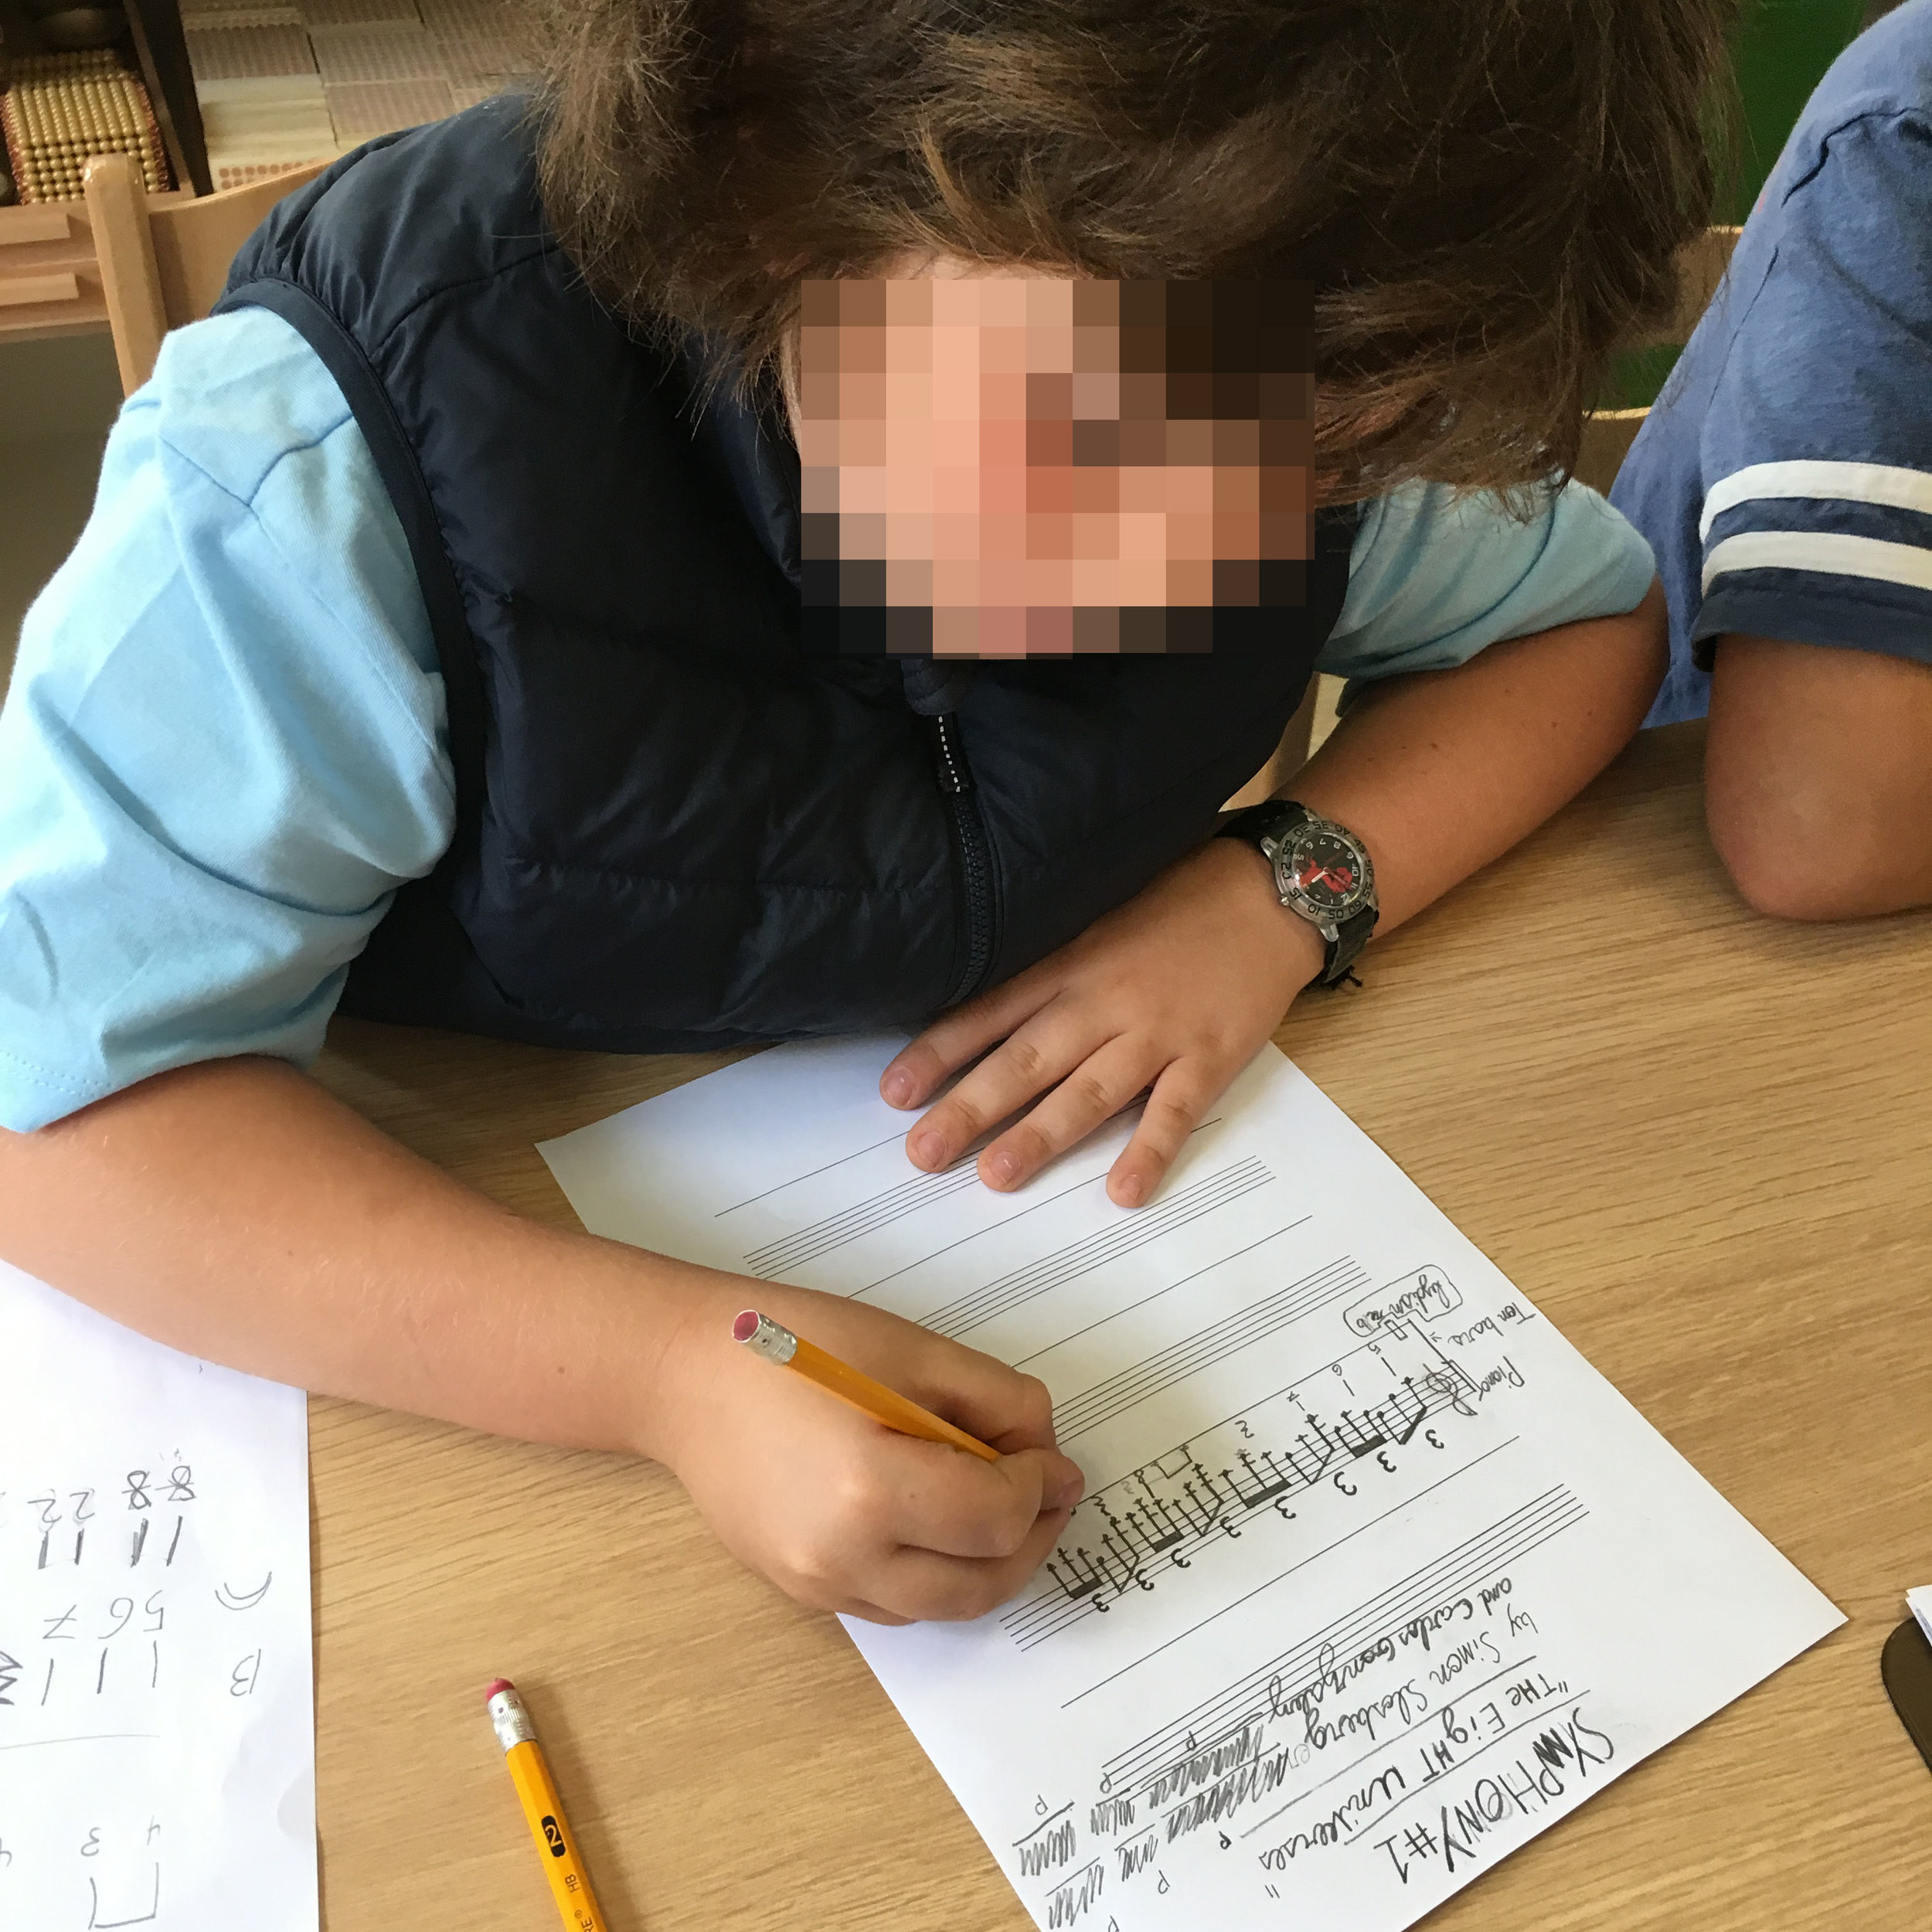
Sully recopying his parts for the Exposition. We had to create special paper for the symphony since the two boys used different notation styles. Notice on Sully’s working draft that each system has a 5-line staff for staff notation and a single-line staff for stick notation. To serve as a clef on the one-line staff, the boys agreed to use a rectangular percussion clef. Just above the staff at the beginning, they wrote and circled the words “lydian re-flat”. This tells a performer which scale strip to use (lydian) and where to place 1 (re-flat).
When we last left off, Christopher had yet to finish writing his countermelodies to Sully’s themes. Yesterday he finished them.
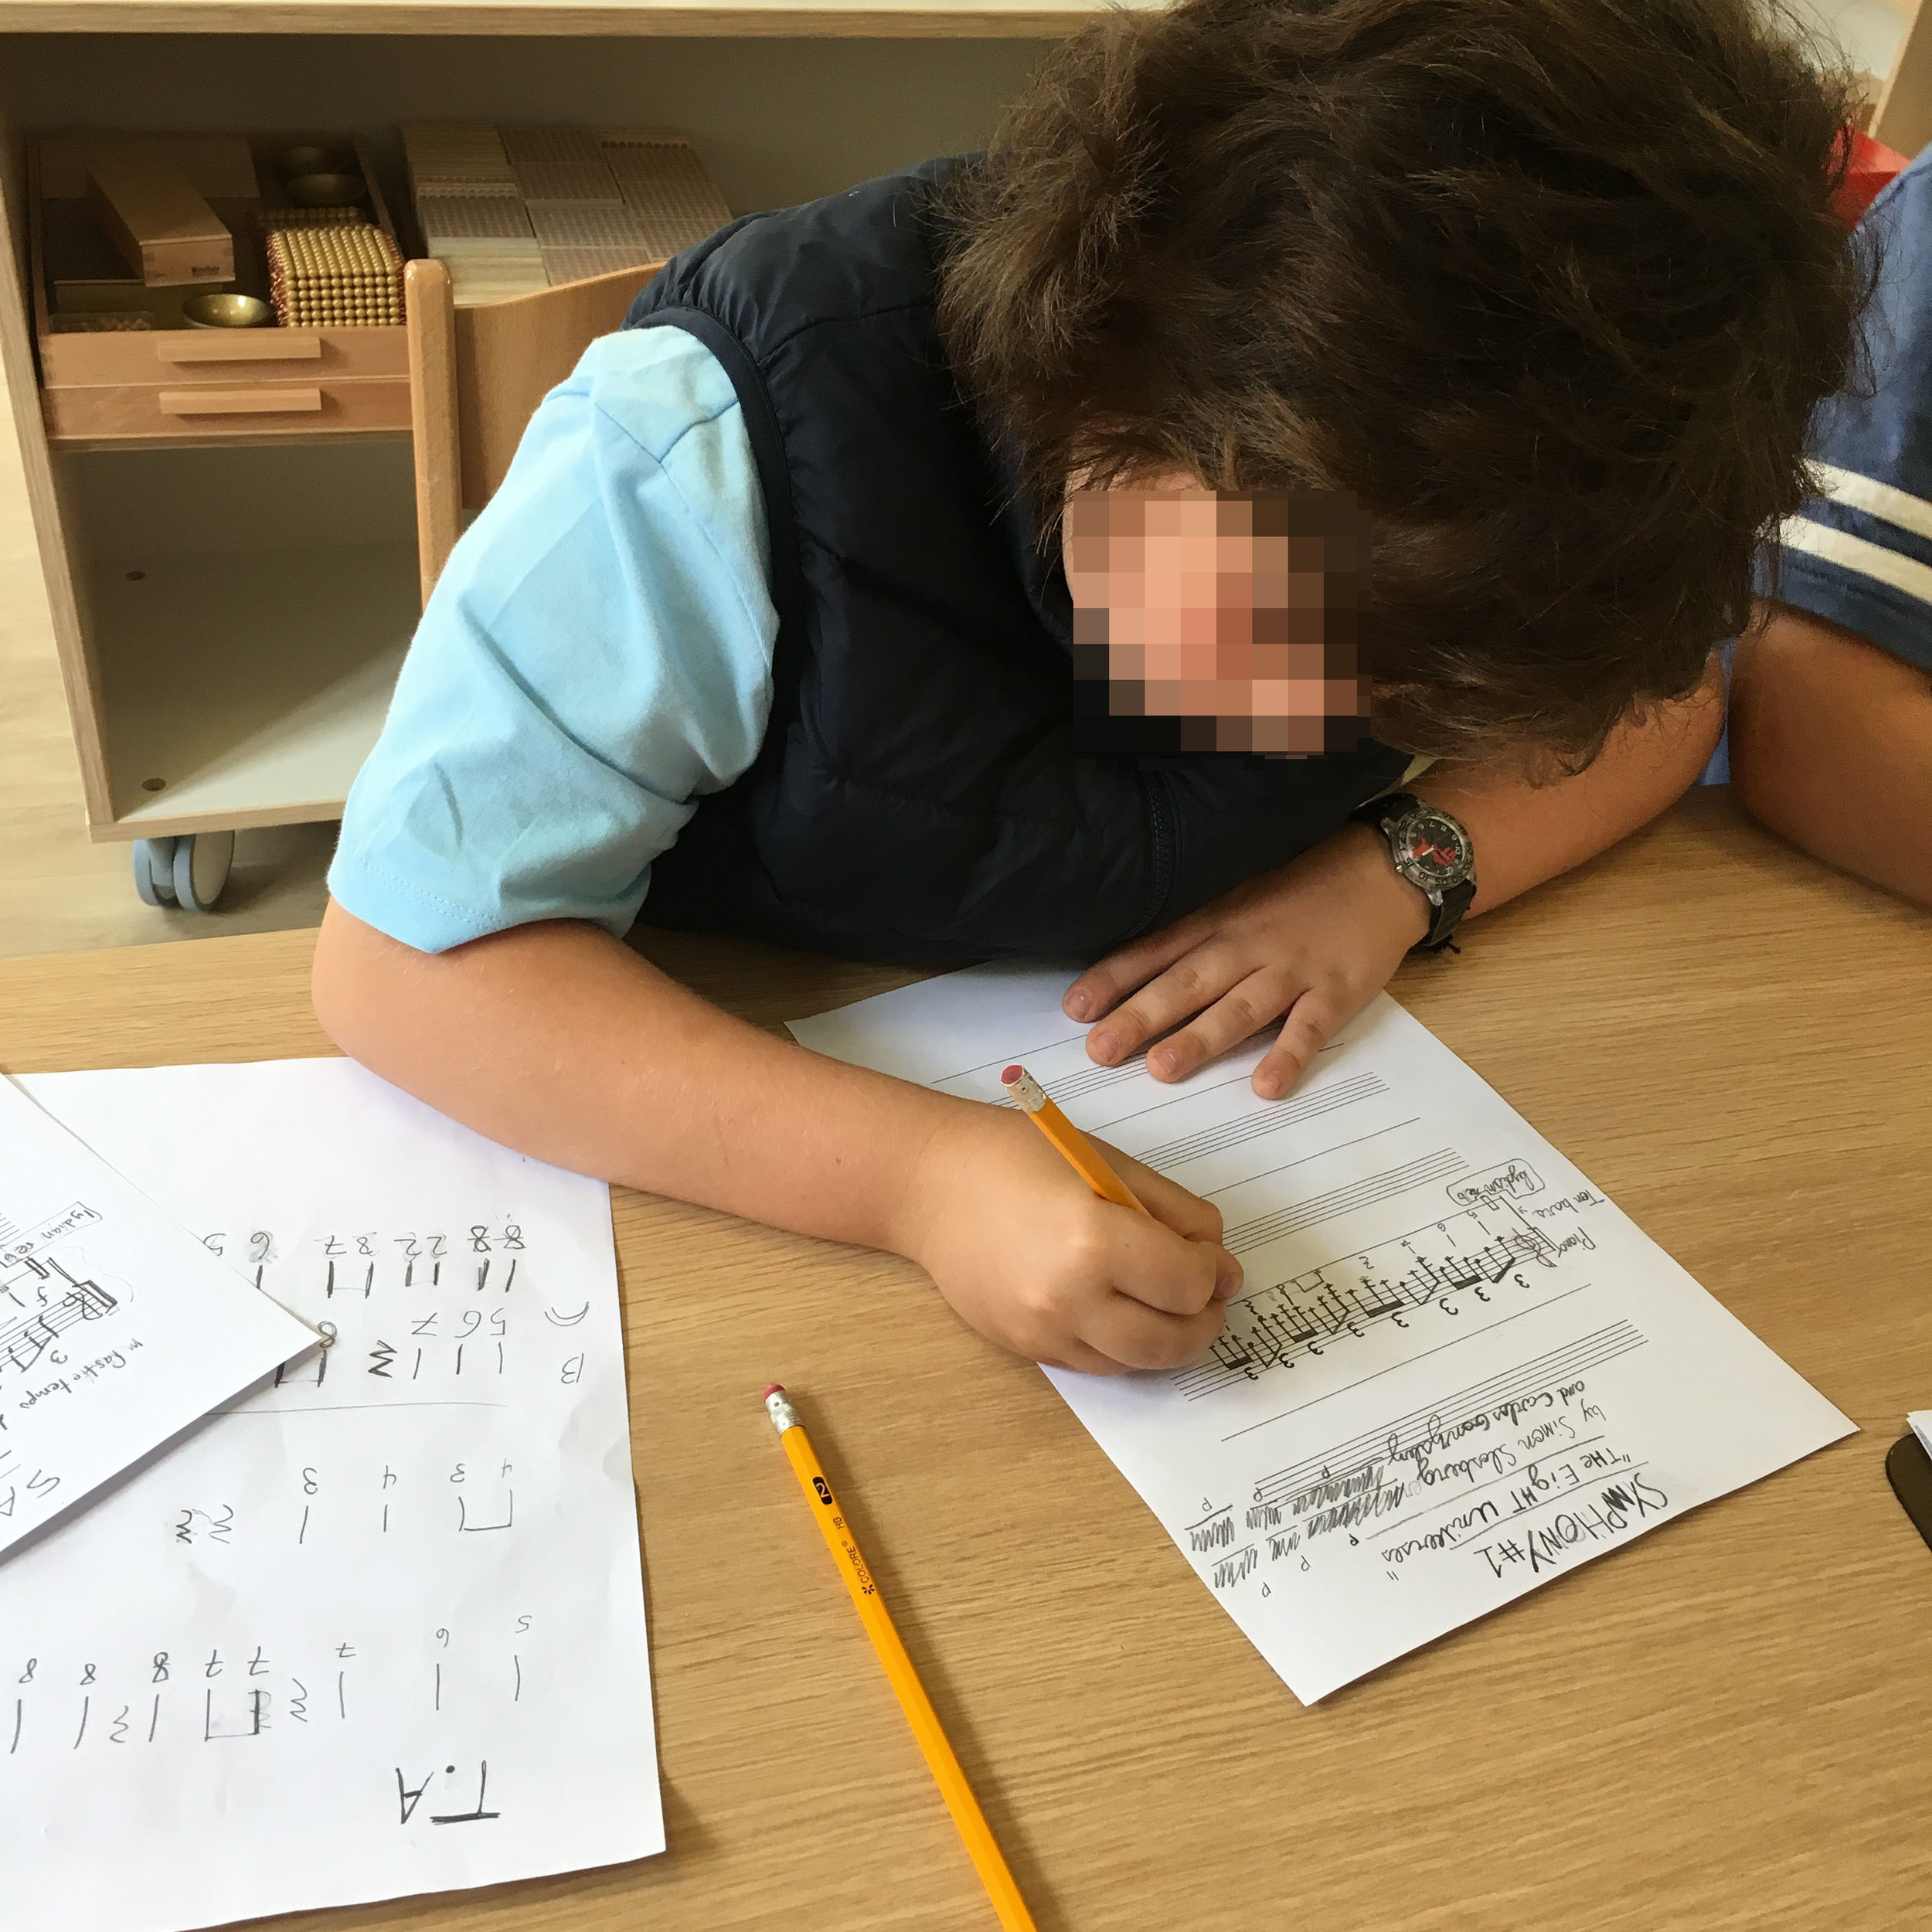
Christopher copies his themes onto the working draft. He writes his melodies on a one-line staff, just below Sully’s. Notice his stick-notated melodies on the paper to the left of the photograph. I like the way Christopher meticulously labelled his different melodies. T.A. stands for “Theme A” and B stands for “Bridge.”.
After they finish copying out their Exposition, they will move on to writing the Development.
Close up of Christopher’s work.
More later!
"L'enfant et la vie"
Hi, everyone! This month I’ll be featured in an article about Montessori music in this French magazine called L’infant et la vie. Pick up your copy starting tomorrow, June 5th!
Symphony No. 1 "Eight Universes" by Slosberg & Rodriguez, Part 1
Children in the upper elementary (9 to 12) love to take on gigantic work. In my forthcoming book, Making Music in Montessori, I developed a follow up activity that shows you how to get children writing multi-movement compositions. Well, last week, Christopher and Sully, a fourth-grader and a fifth-grader, respectively, (these are not their real names), got inspired to write their own symphony! Let me tell you how I guided them through the process.
SOME BACKGROUND INFORMATION
Just to give you some background, it’s important to know that the word “symphony” refers to the structure of the piece, NOT the instrumentation. One can write a symphony for any combination of instruments. Sully and Christopher chose to write their symphony for piano, tone bars, and percussion instruments.
Also, a typical symphony unfolds in four movements. (Although, composers through time have written symphonies containing between 3 and 7 movements.)
The symphony structure goes roughly like this:
Movement I: sonata-allegro form with optional introduction.
Movement II: slow and soft movement. This movement can be in any form the child likes.
Movement III: up tempo, quick and light dance movement. Again, this can be in any form.
Movement IV: sonata-allegro form with big dramatic ending.
SONATA-ALLEGRO FORM
After an overview of this overall structure, I set about telling the children about sonata-allegro form.
To begin, I simply told the children a story that went something like this: Once there lived a distinguished court gentleman and a graceful court lady. The two were in love. They both lived quite far from each other on opposite sides of a great river. Fortunately for both of them, a stone bridge stretched across the river and made it possible for the two to meet. One evening they met at a ball. They danced, talked about their lives, and generally had a nice time together. Eventually, the gentleman asked the lady to marry him. She agreed, and the two walked across the bridge and spent the rest of their lives together.
Now, this story could easily have been about swashbuckling pirates or superheroes, or any two characters (the two main themes) going on an adventure and returning with one of them slightly changed. But it makes a bit more sense when you know the reasoning behind it.
Classical composers of old used sonata-allegro for the first and fourth movements of their symphonies (see above). It’s the musical equivalent of the classic “Hero’s Journey”. The form comprises three sections, an Exposition, a Development, and a Recapitulation.
It begins with the Exposition, wherein a main theme, which we’ll call (a), comes on the scene. The distinguished court gentleman in our story stands for this theme. After we hear (a), some music called a bridge brings the music to a second theme (b) - our graceful maiden. Once we’ve heard both themes, everything up to that point repeats. (Sometimes composers begin with an introduction.) Next comes the Development section. Here, the two themes (a) and (b) appear in variation. The composer spins them around, and generally plays around with them. In my little story, the Development occurs when the courtly gentleman and the graceful maiden dance at the ball. Finally, we have the Recapitulation section. Here, both themes return, except that theme (b), the secondary theme, appears slightly different from how we heard it in the Exposition. Clear, simple examples of sonata-allegro from in Classical music include:
First movements of symphonies by Haydn.
Barber of Seville Overture, by Rossini.
Symphony No. 40, Eine Kliene Nachtmusik, and Piano Sonata KV 283 by Mozart
Symphony No. 5 and Piano Sonata Op. 10, No. 2 by Beethoven.
Continuing on: To demonstrate sonata-allegro form, I brought out a recording of the first movement of Mozart’s Eine Kleine Nachtmusik, one of many clear examples of sonata-allegro form in authentic Classical music. While we listened to the piece, I (frantically) drew some cards and laid them out in the following pattern:
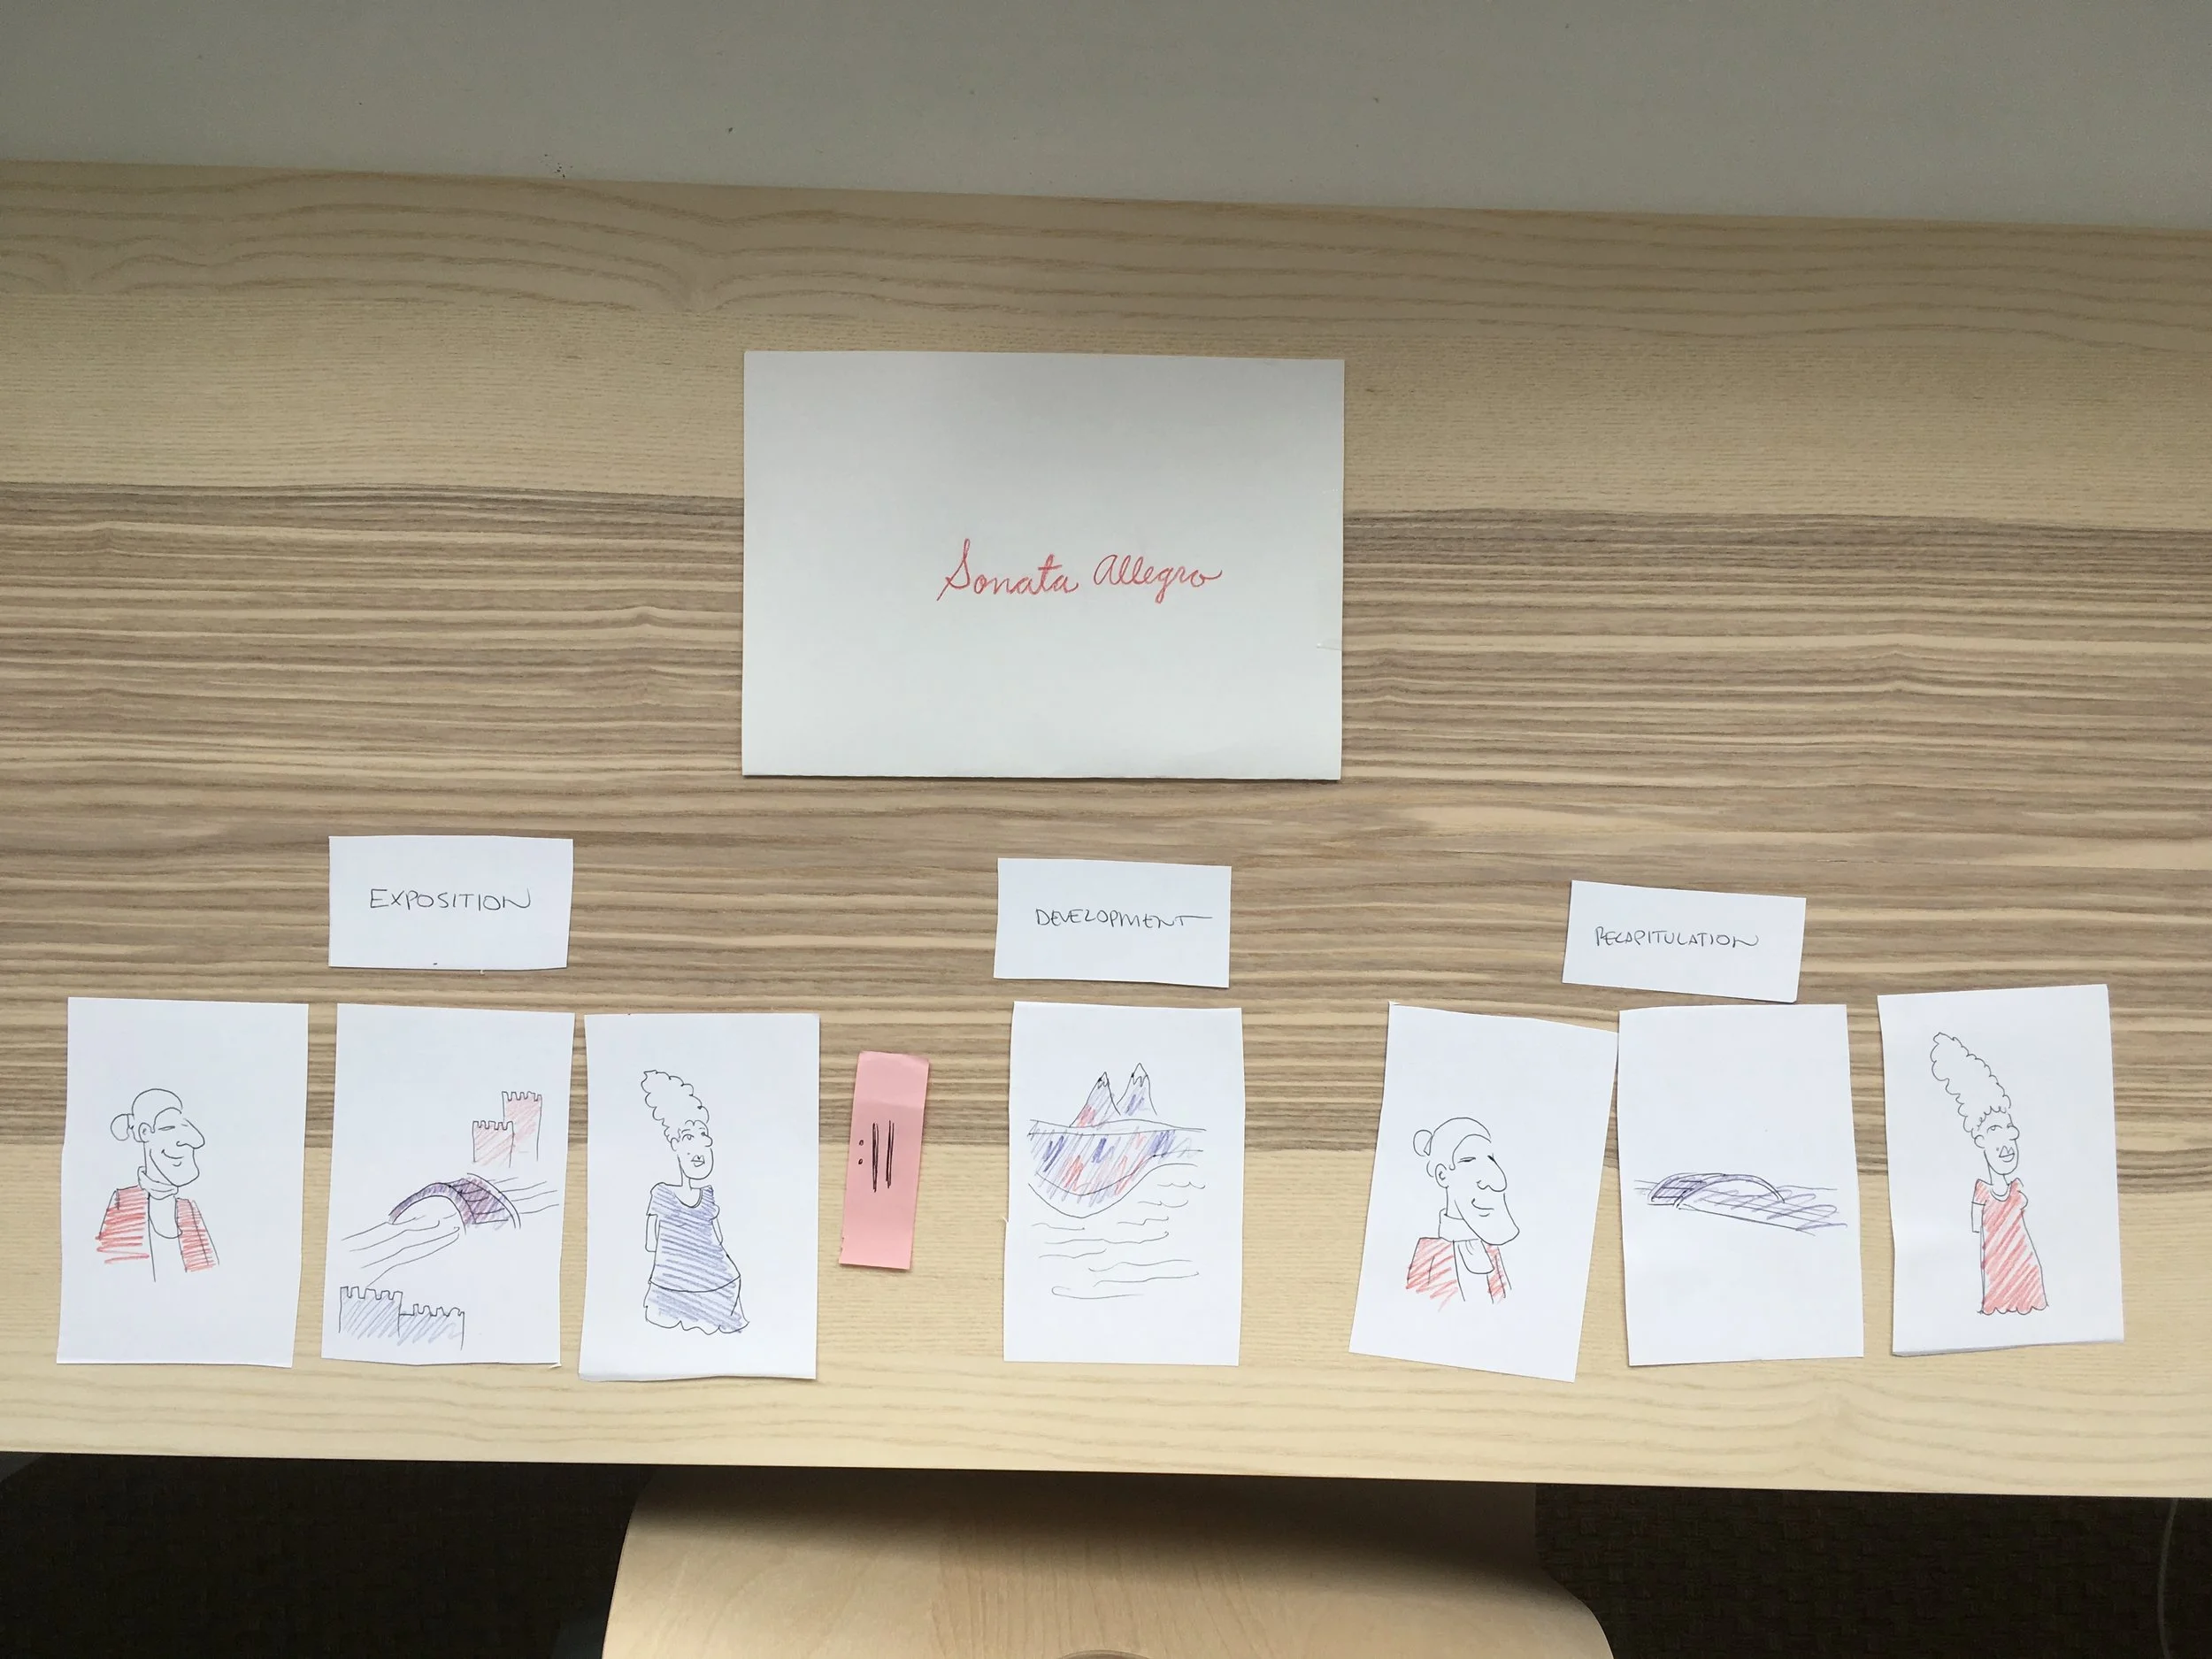
Please forgive the crudeness of the cards depicted here. I didn’t have the material for this activity finished, so I drew these on the fly. Having got the children riled up about doing the activity, I didn’t have a lot of time. I had to strike while the iron was hot!
At any rate, you can see the first theme of the Exposition depicted as a courtly gentleman in a coat of red. The maiden in blue represents the second theme, and the purple bridge between them is, well, the bridge. The card for the Development section should have probably been a ballroom, but I think in the version of the story that I told Christopher and Sully, the couple went on lots of travels and adventures instead of attending a ball. At any rate, when the two themes come back for the the Recapitulation, the maiden’s dress becomes red, as she’s changed a little bit.
COMPOSING THE TWO PRINCIPAL THEMES
After the children had a concept of the overall Sonata-allegro structure, they went on to the next step: composing their two themes. So, I sent Sully off to the piano to compose. He had some experience writing music on a staff, so he notated his themes on musical staff paper.

Sully composing his themes at the piano (wearing optional bicycle gloves).
As a side, erm, note, it’s worth mentioning here that although Sully had some experience writing music on a staff, Christopher didn’t. That wasn’t a problem. Sully notated his themes on staff paper, and Christopher notated his ideas using stick notation. We should never let a lack of knowledge of traditional musical notation stop children from expressing their musical ideas. They can combine different types of notation, such as graphic notation, staff notation, and stick notation, to write down their musical thoughts. In fact, when their symphony is finished, Christopher and Sully will likely just combine their two notation styles onto the finished score. (Unfortunately, I don’t have an example of Christopher’s music to show you at the moment.)
Anyway, below you can see Sully’s two main themes.
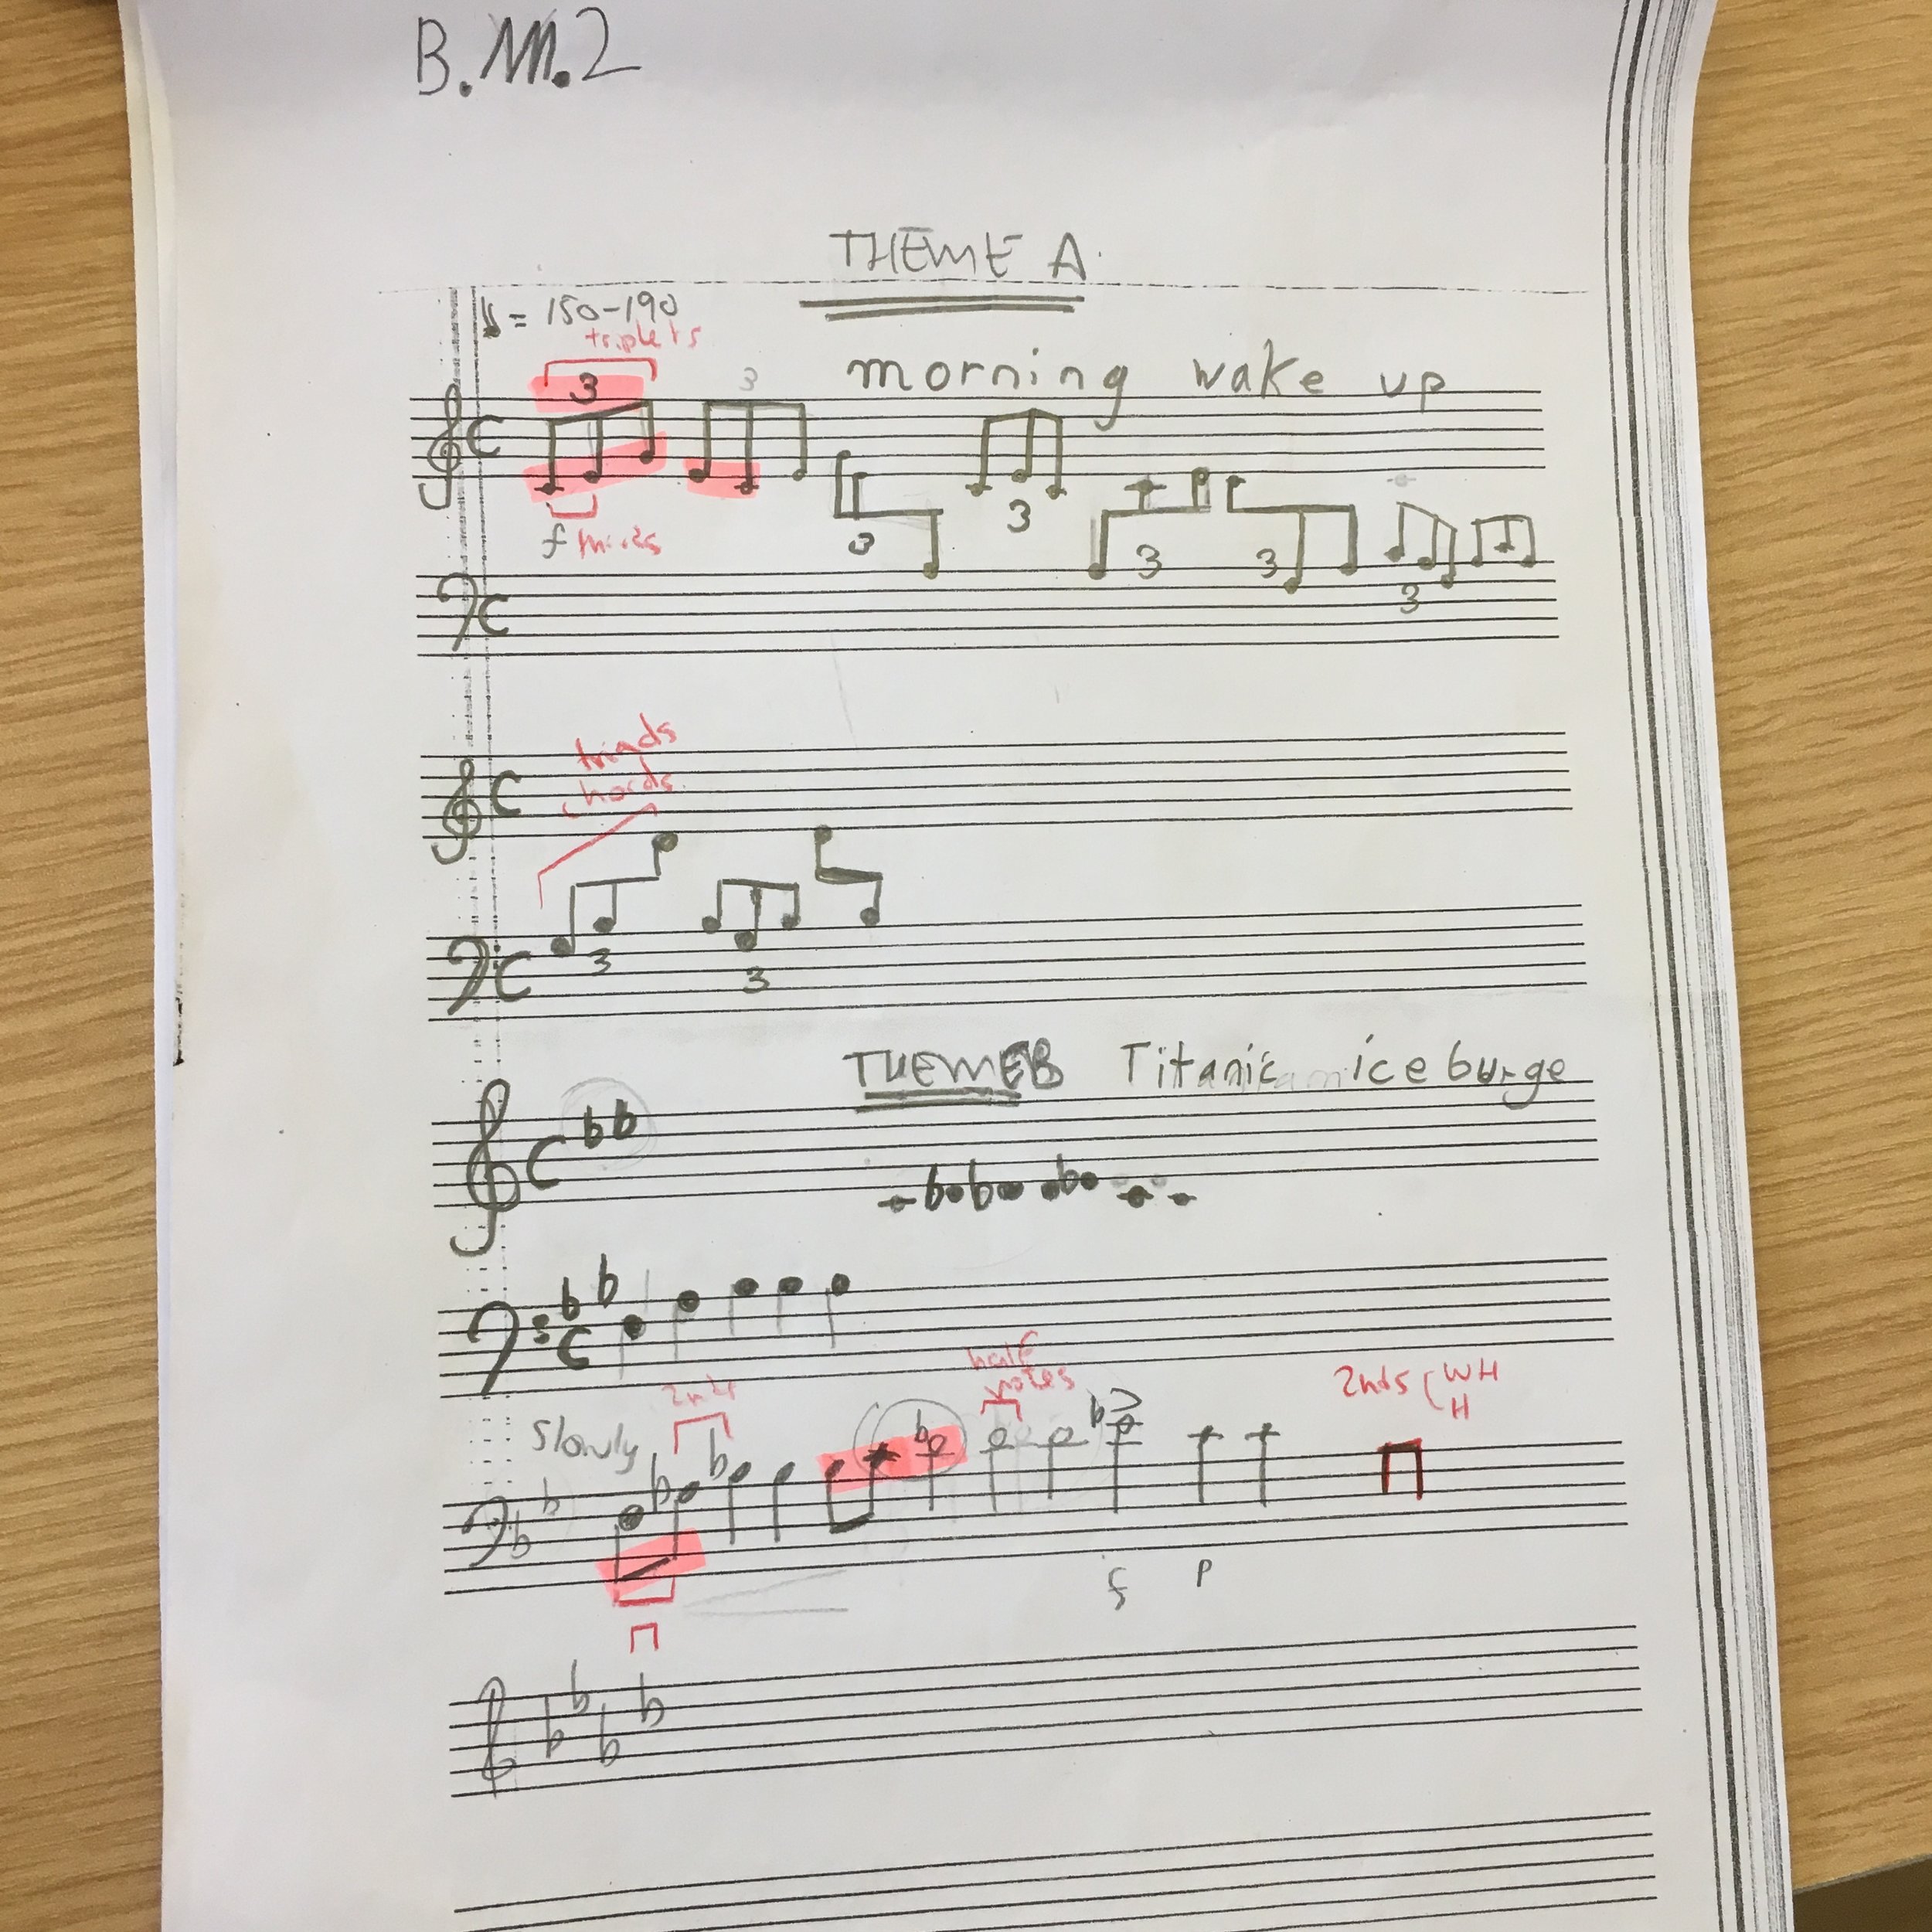
It’s important that the themes contrast in some way. Here, Sully wrote Theme A using a quick tempo, triplets, thirds, and triadic leaps. Theme B, however, uses a slower tempo, longer notes subdivided in twos, and stepwise motion. He also gave his themes names, "Morning Wake Up” and “Titanic Ice Bridge,” which I find exceedingly cute.
COMPOSING VARIATIONS
Next, Sully and Christopher took their themes and wrote 3 variations on each theme. The variations will prove useful for helping the boys to analyze their themes, create unity in their piece, and develop material for both the bridge and the Development section.
To write their variations, the boys analyzed their themes and came up with just a few key characteristics to exploit. I helped them with their analysis by marking the characteristics in red ink and pink highlighter pen, as you see on the picture of Sully’s theme above.
As you can see below, Sully made use of the characteristics from his theme in writing his three variations. Just to give you a specific example, as I mentioned in the caption above, in his Theme A, Sully used triplets, triadic leaps, and arpeggiated chords. Look how Variation #1 makes use of those characteristics.
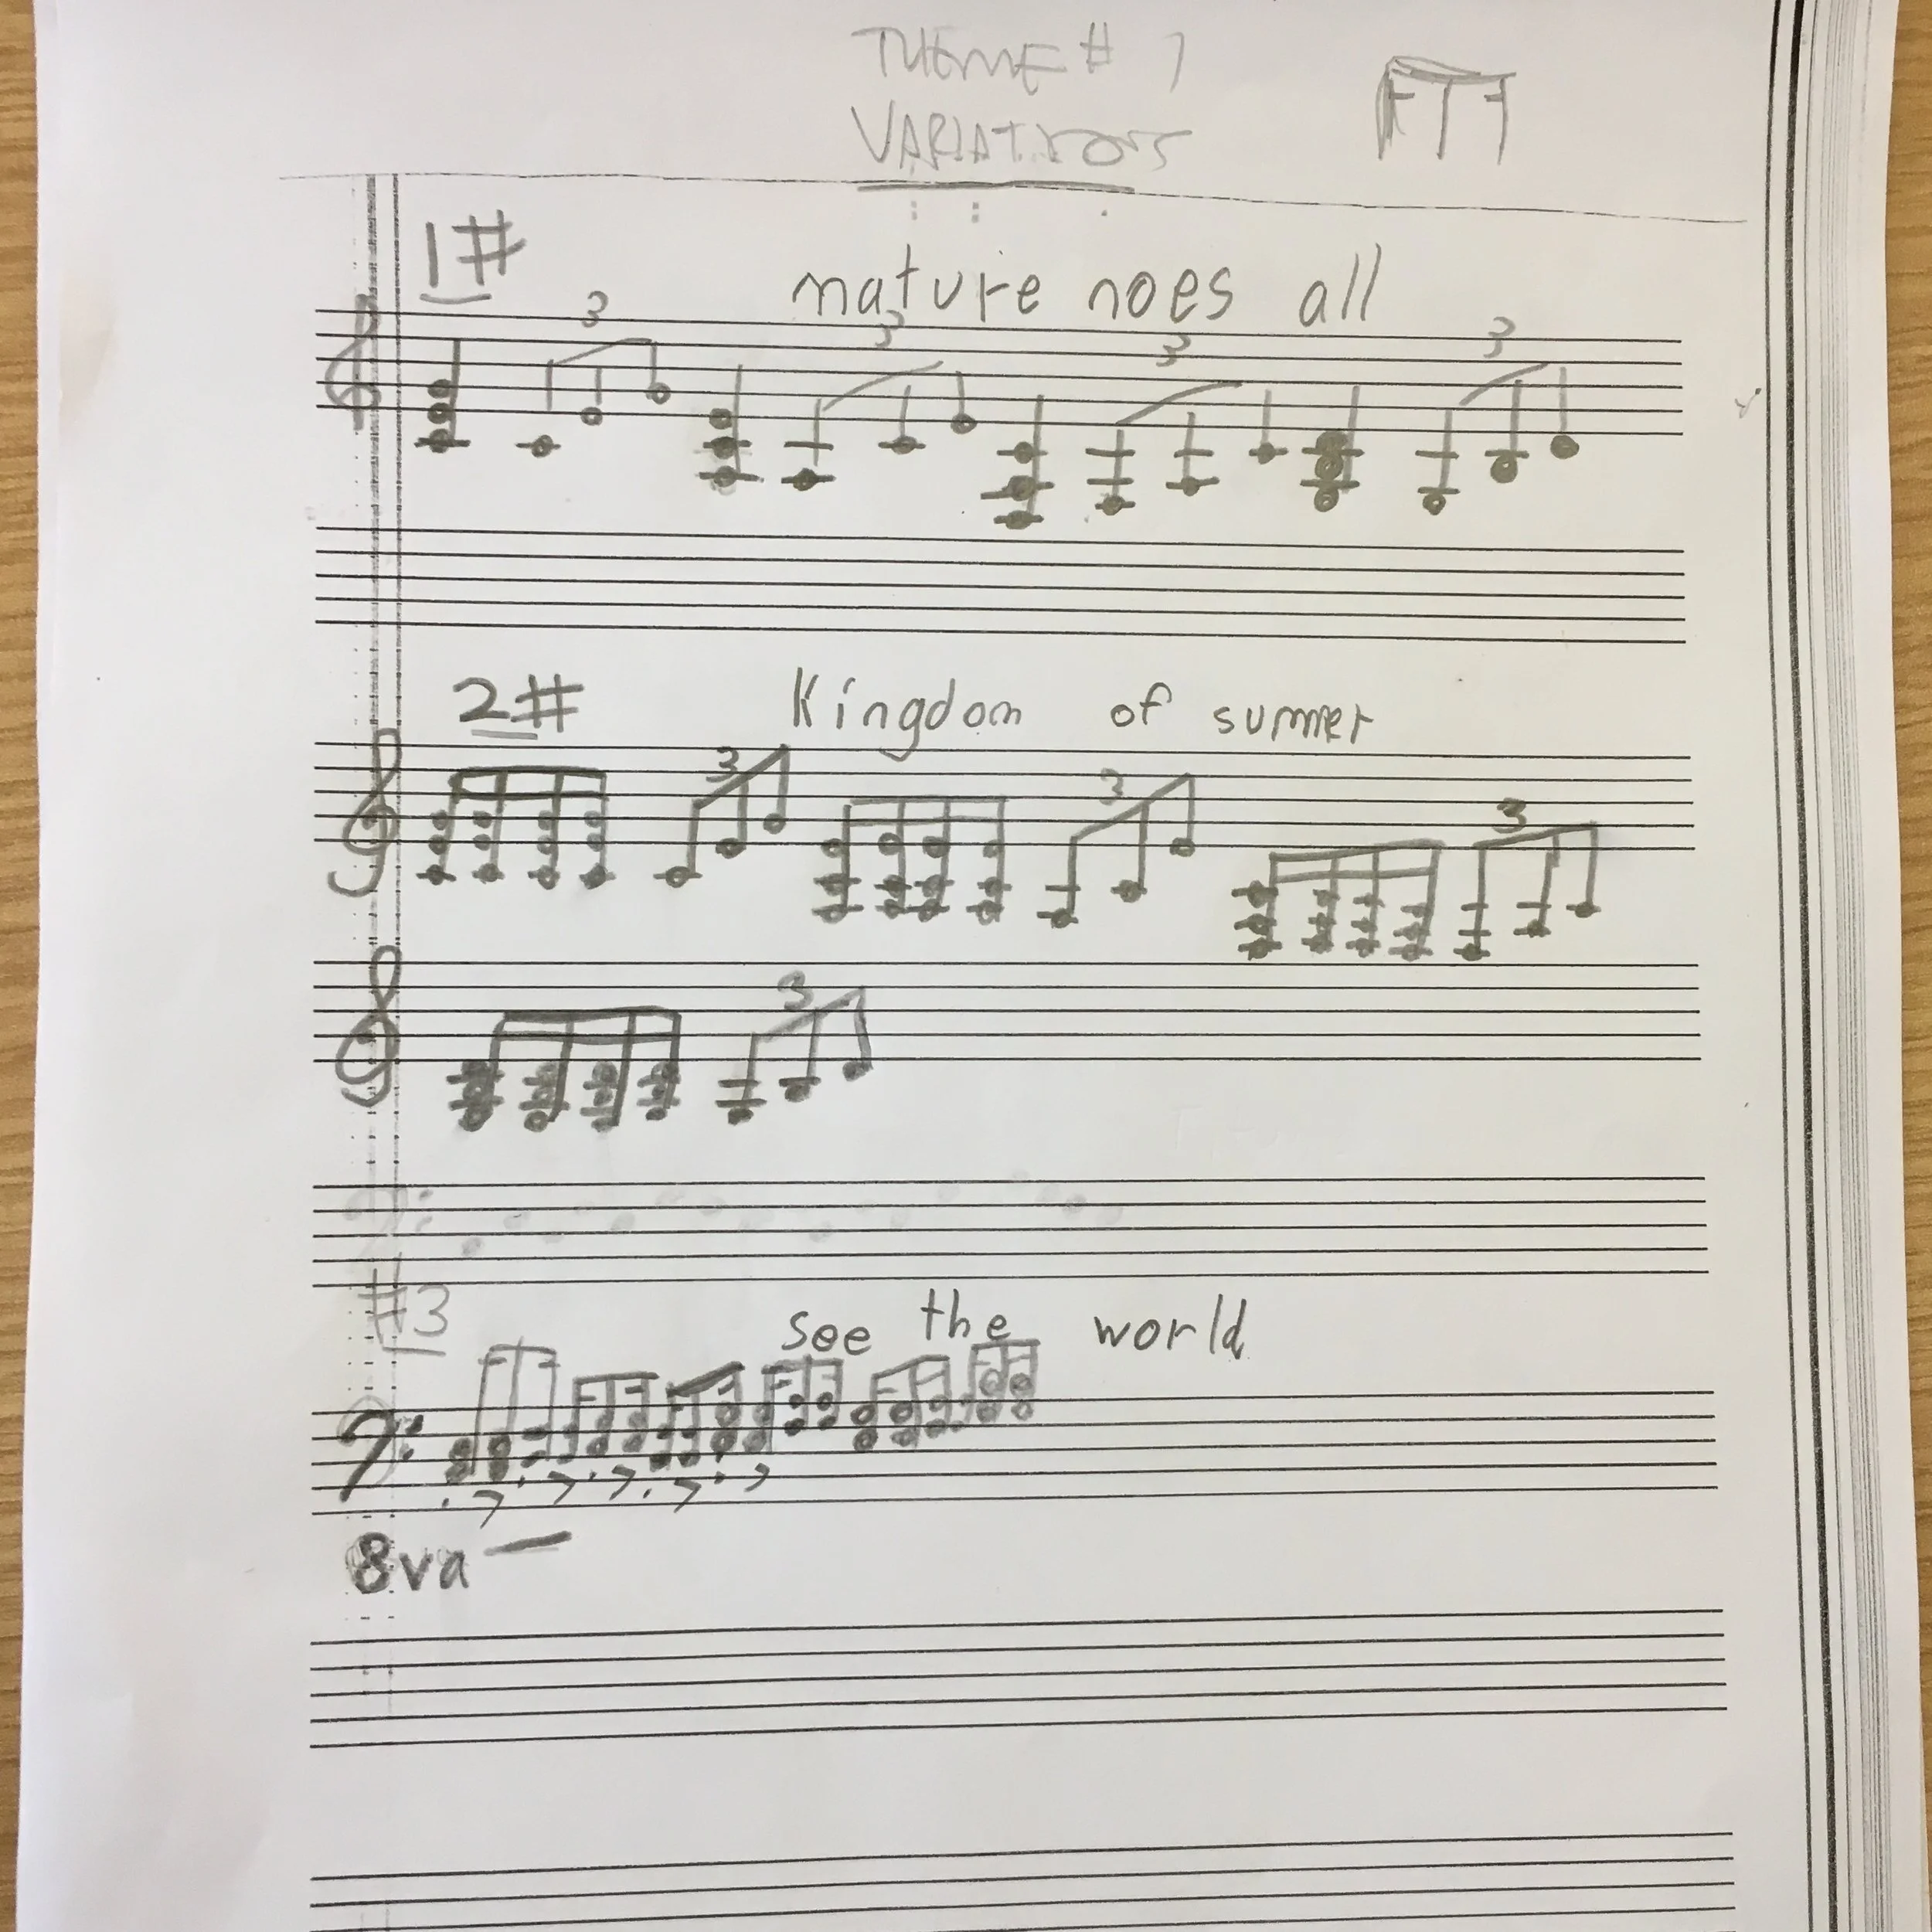
Sully’s variations on Theme A. Each variation uses the characteristics of Theme A, but also differs from the original theme and from each other. Again, the boys gave their variations the titles “Nature Knows All”, “Kingdom of Summer” and “See the World”. They will use these variations, or ideas from them, in subsequent parts of their symphony.
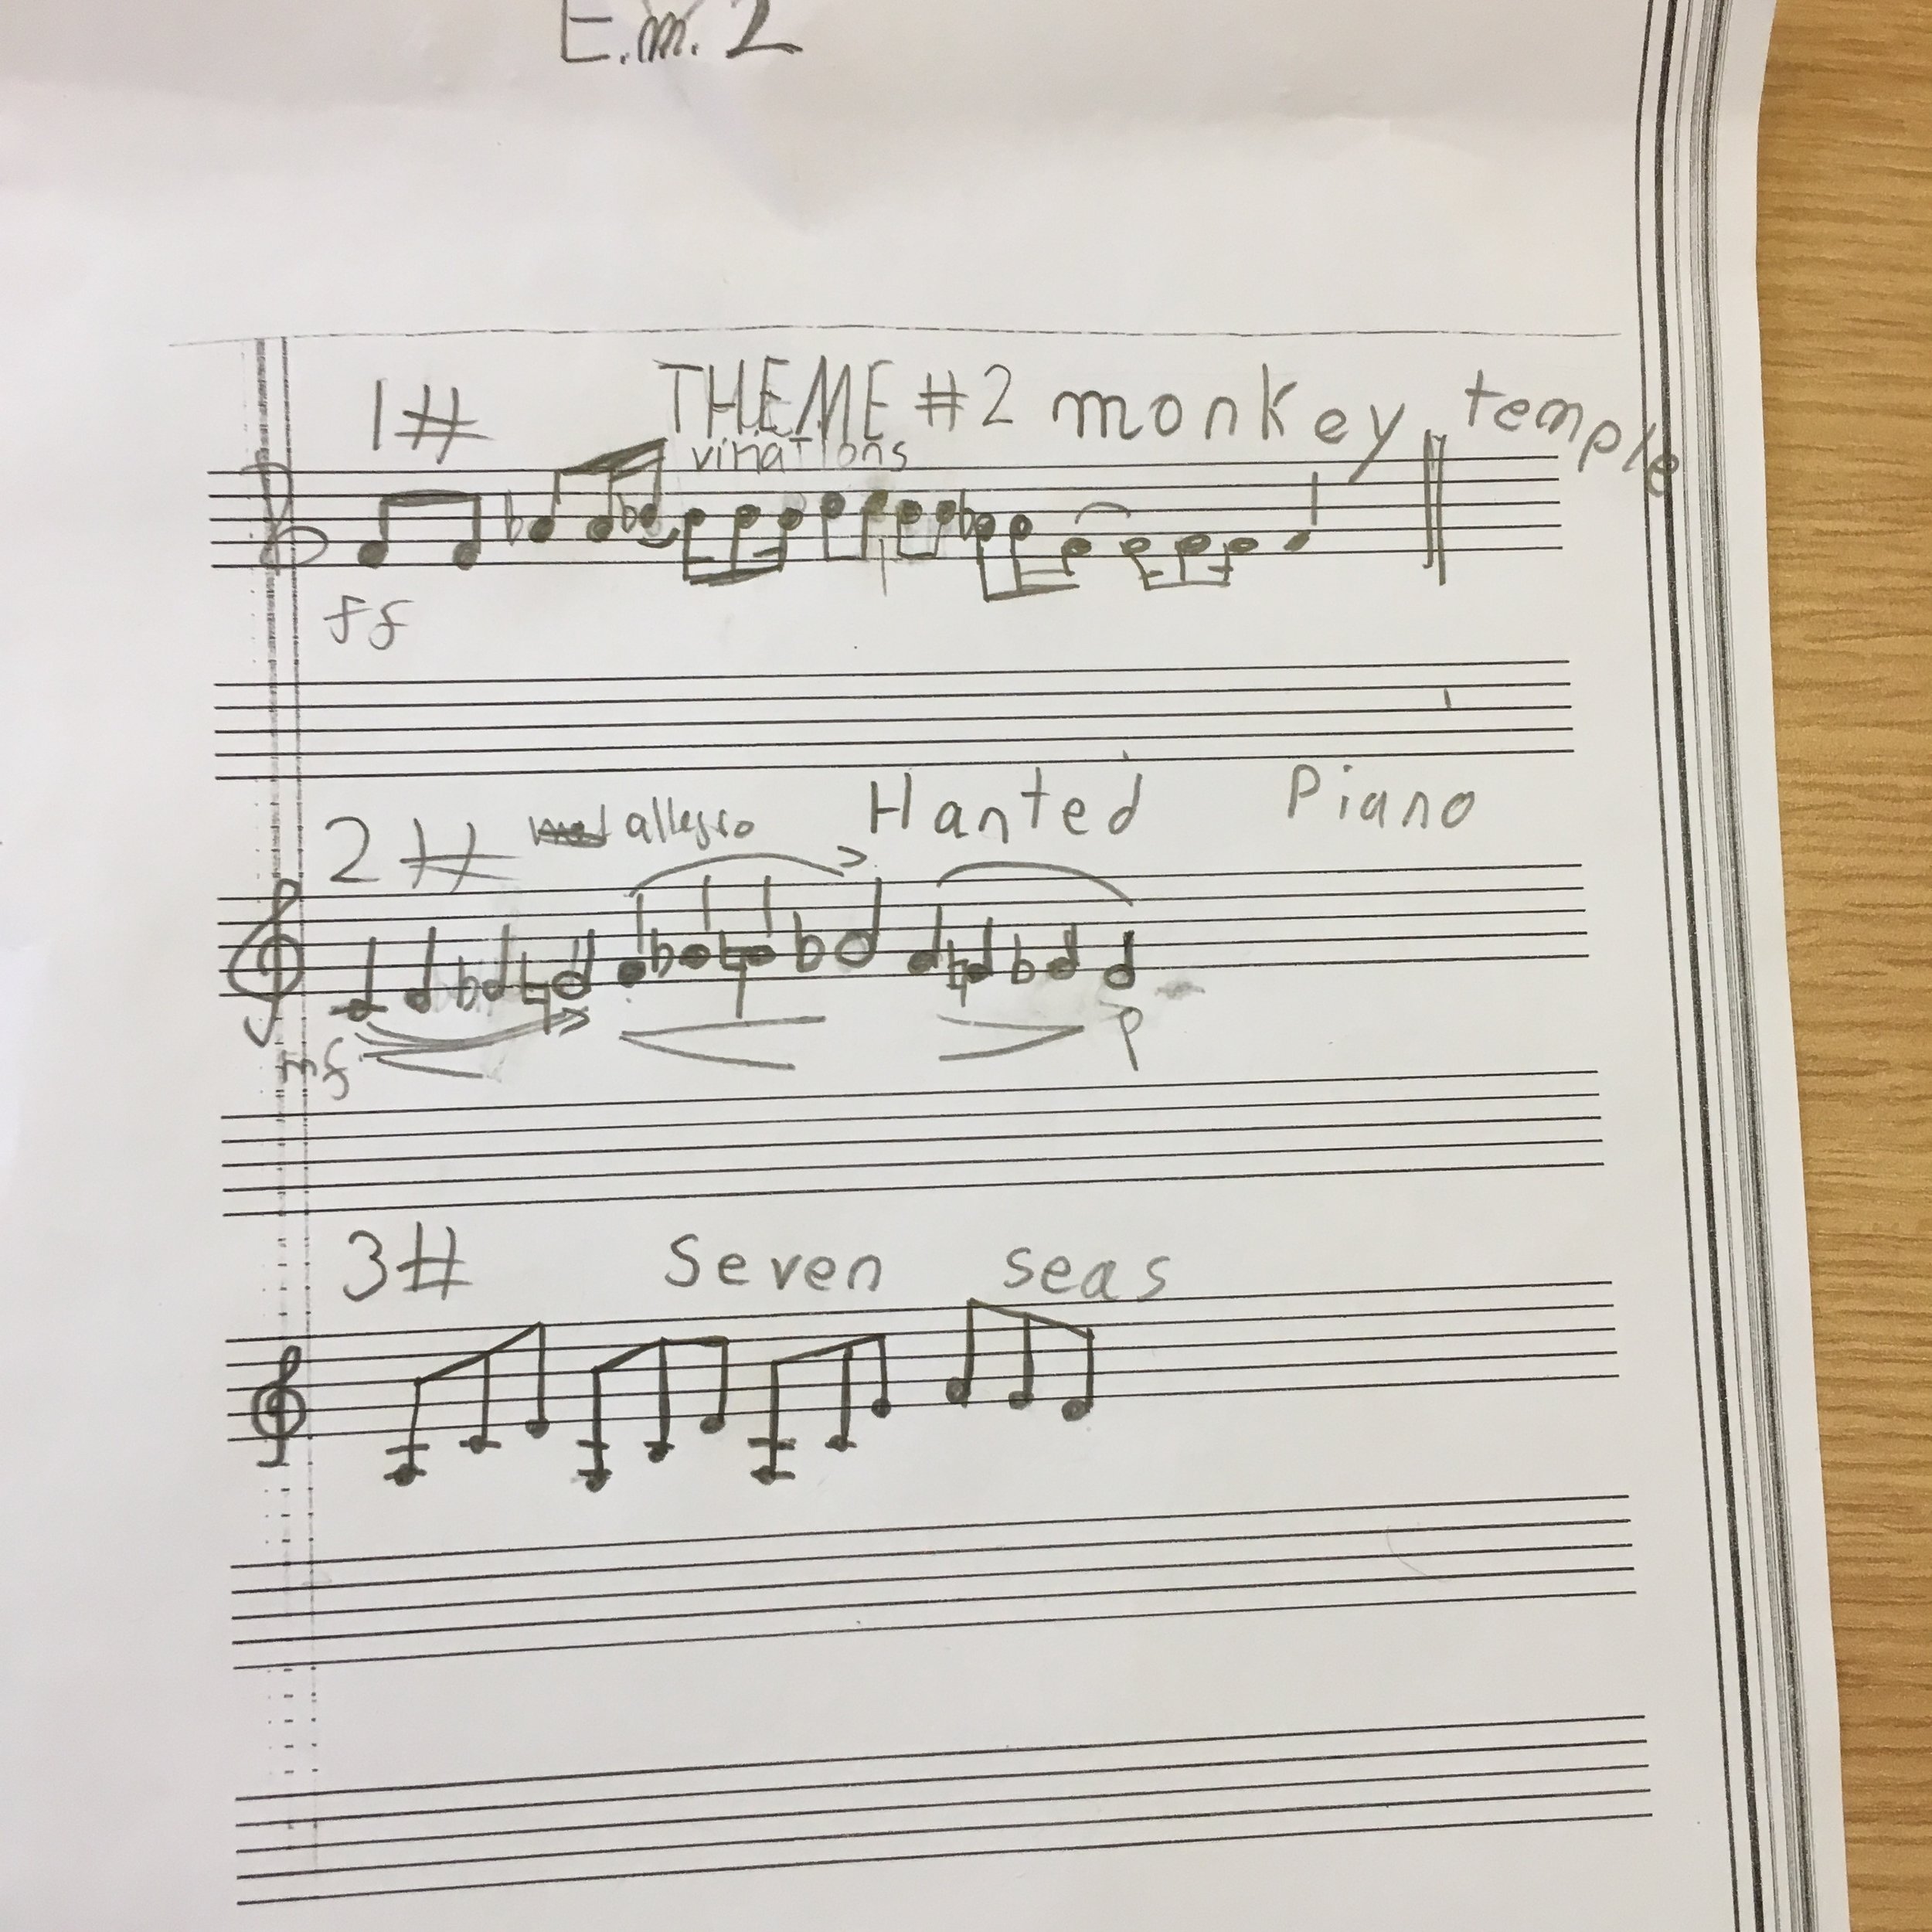
Here, Sully got a little adventurous with his titles, giving his first variation on Theme B the title “Monkey Temple”. Notice the stepwise motion in this variation. In “Haunted Piano” Sully uses long notes and chromatic movement. He goes back to using chords and thirds for “Seven Seas”. All of these characteristics he took from his original Theme B.
BEGINNING TO WRITE THE SYMPHONY
Now that the boys had written two themes and three variations for each theme, they began to write their symphony. First, we wrote a “road map” of the first two movements, which you can see below on the table next to where Sully is writing.
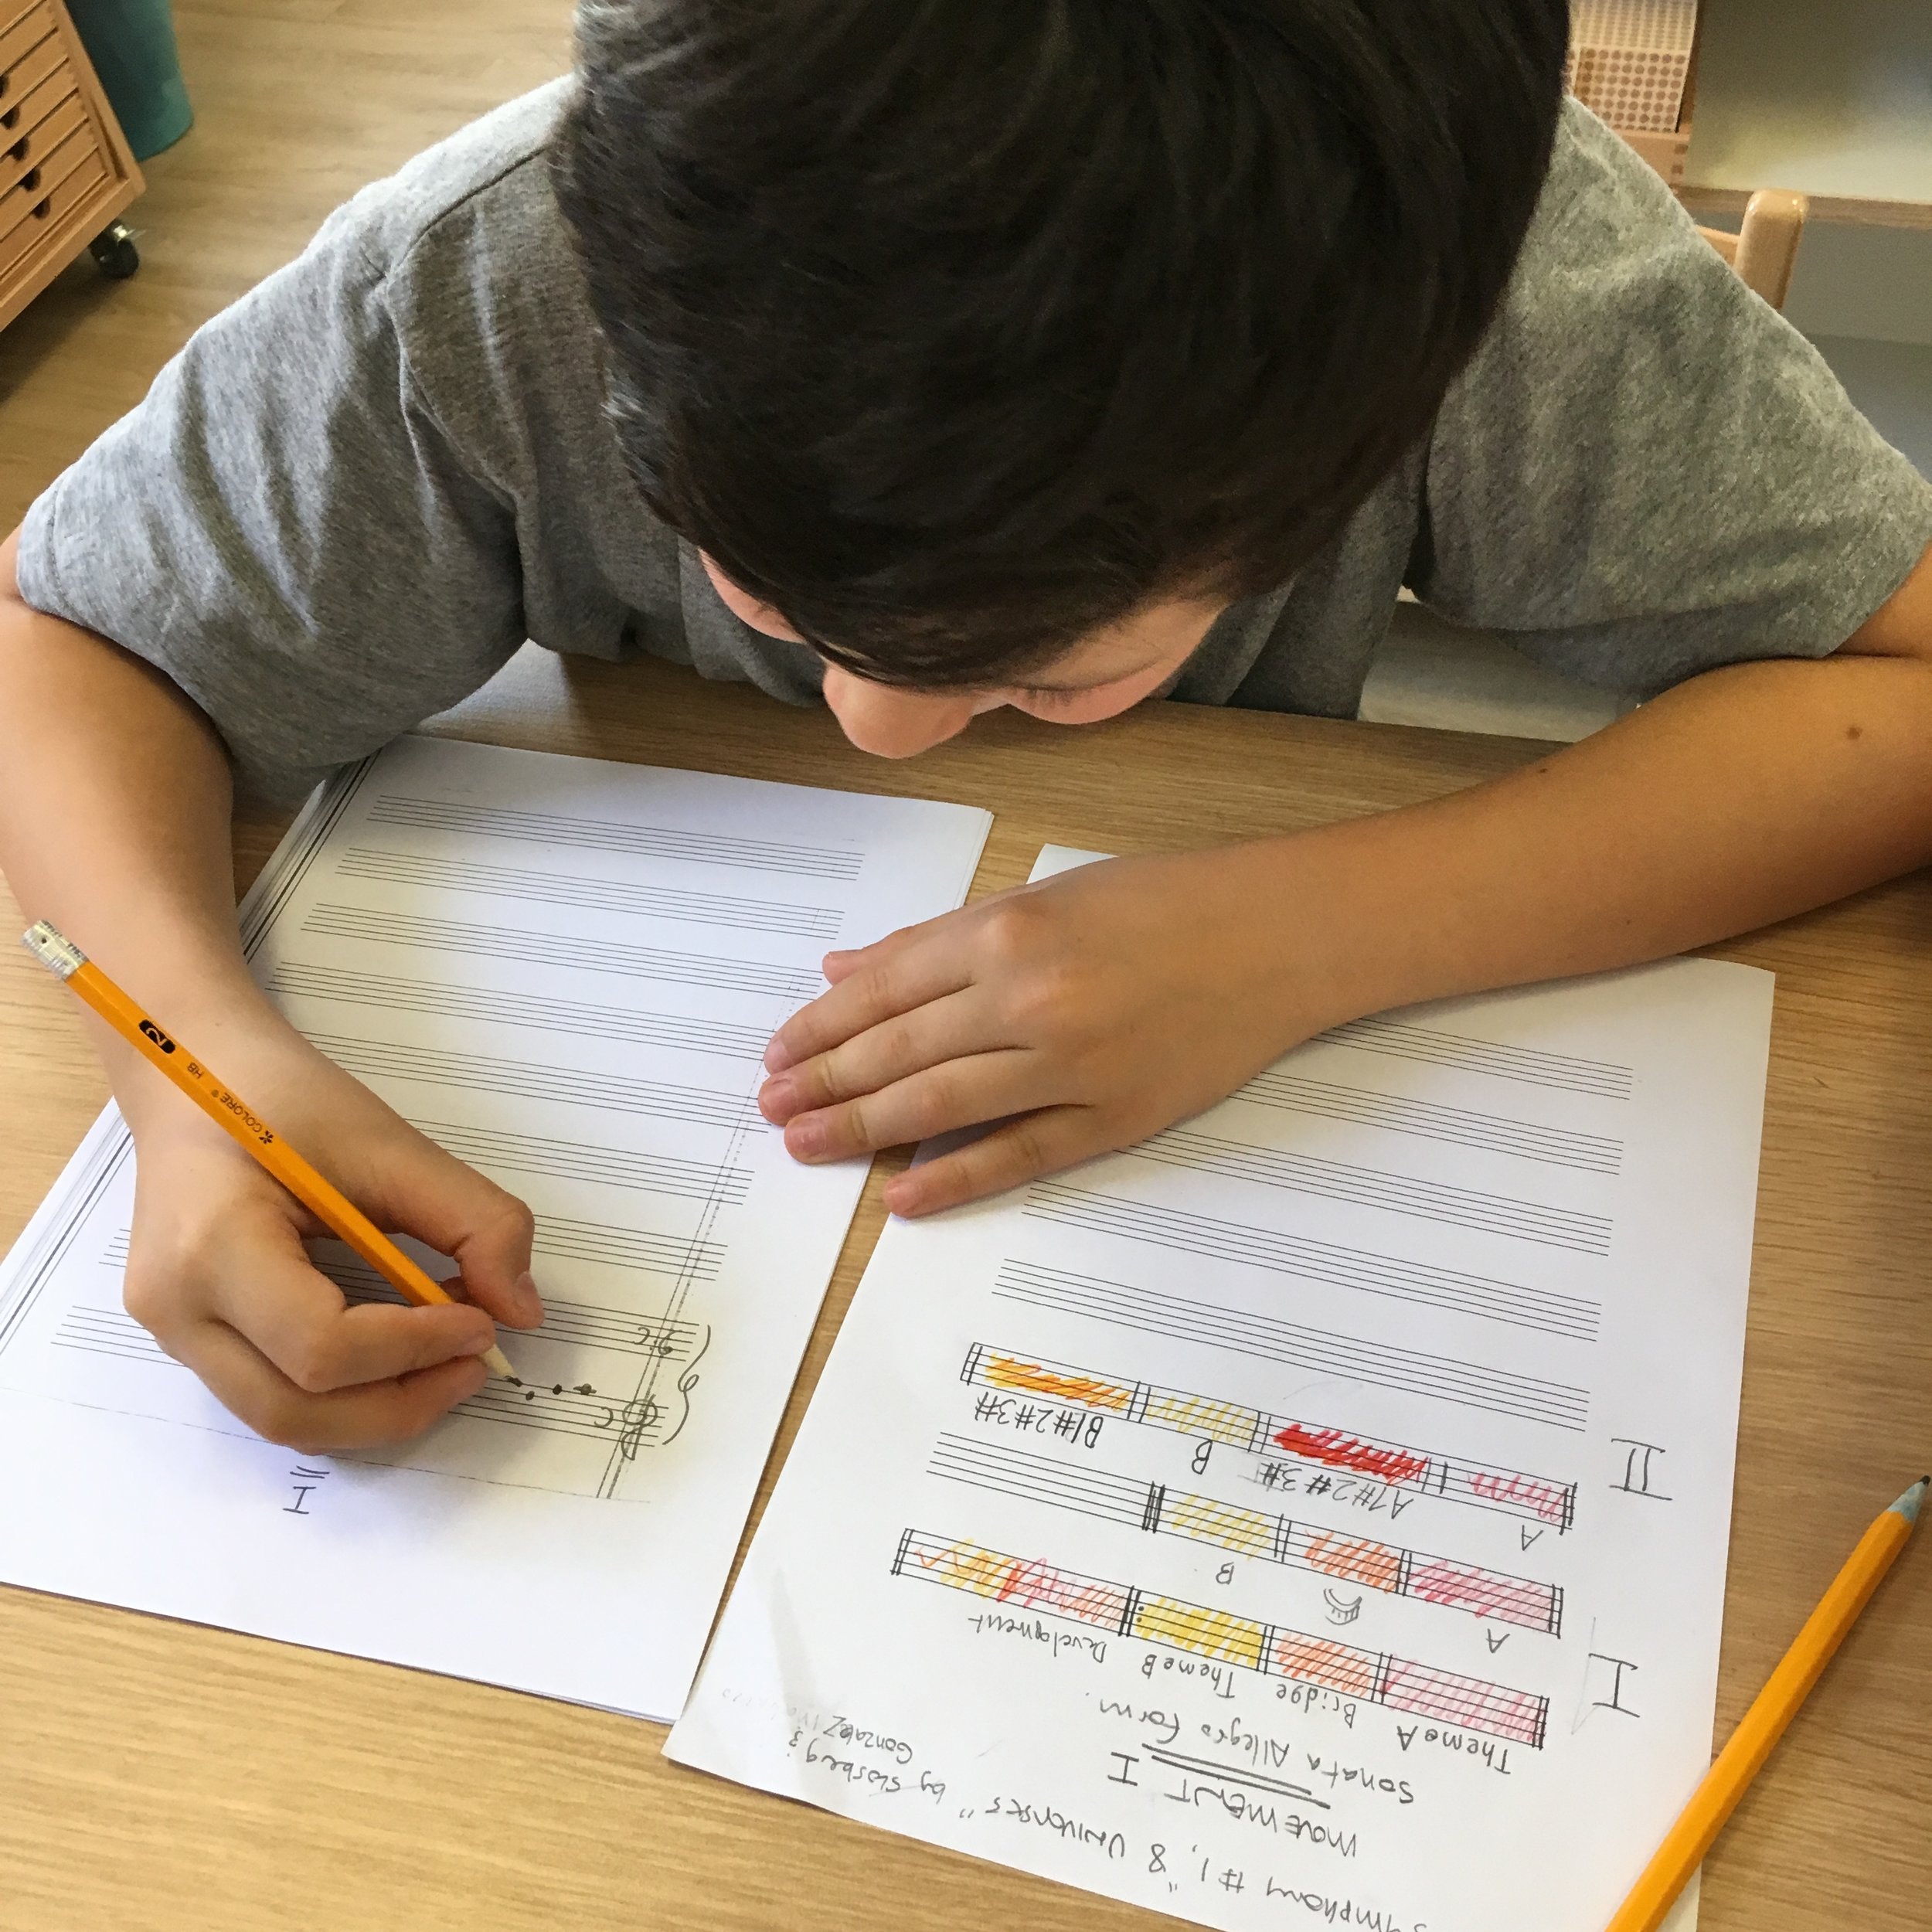
Sully begins writing his symphony. You can see the plan for Movements I and II on the right. Notice on the road map the boys already planned out Movement II.
At this point, the boys had already given their symphony a title: Symphony No. 1, “Eight Universes”
Incidentally, I encouraged the boys at this stage to write their music away from a musical instrument. It’s much easier to let the ideas flow when you aren’t sitting at an instrument and futzing around. Plus, at the instrument, you are limited by your technical skill. Away from an instrument, you can let your imagination wander. If you have a musical idea in your head that you don’t know how to write, scribble it down in graphic or rhythm notation first, and then go to the instrument and figure out what notes you want.
And that’s where we left off! Just getting this far in the process took about a week. Expect a long-form composition to keep the children engaged for a long time.
I’ll keep you posted as the symphony progresses. Until then, I hope this provided you some inspiration. Feel free to contact me if you have any questions.
Until next time!
Famous Composers Game!
For a follow-up to a lesson about the Boulanger sisters, some children and I created a board game about famous composers. We came up with the design and the rules together. I wanted to share it with you.
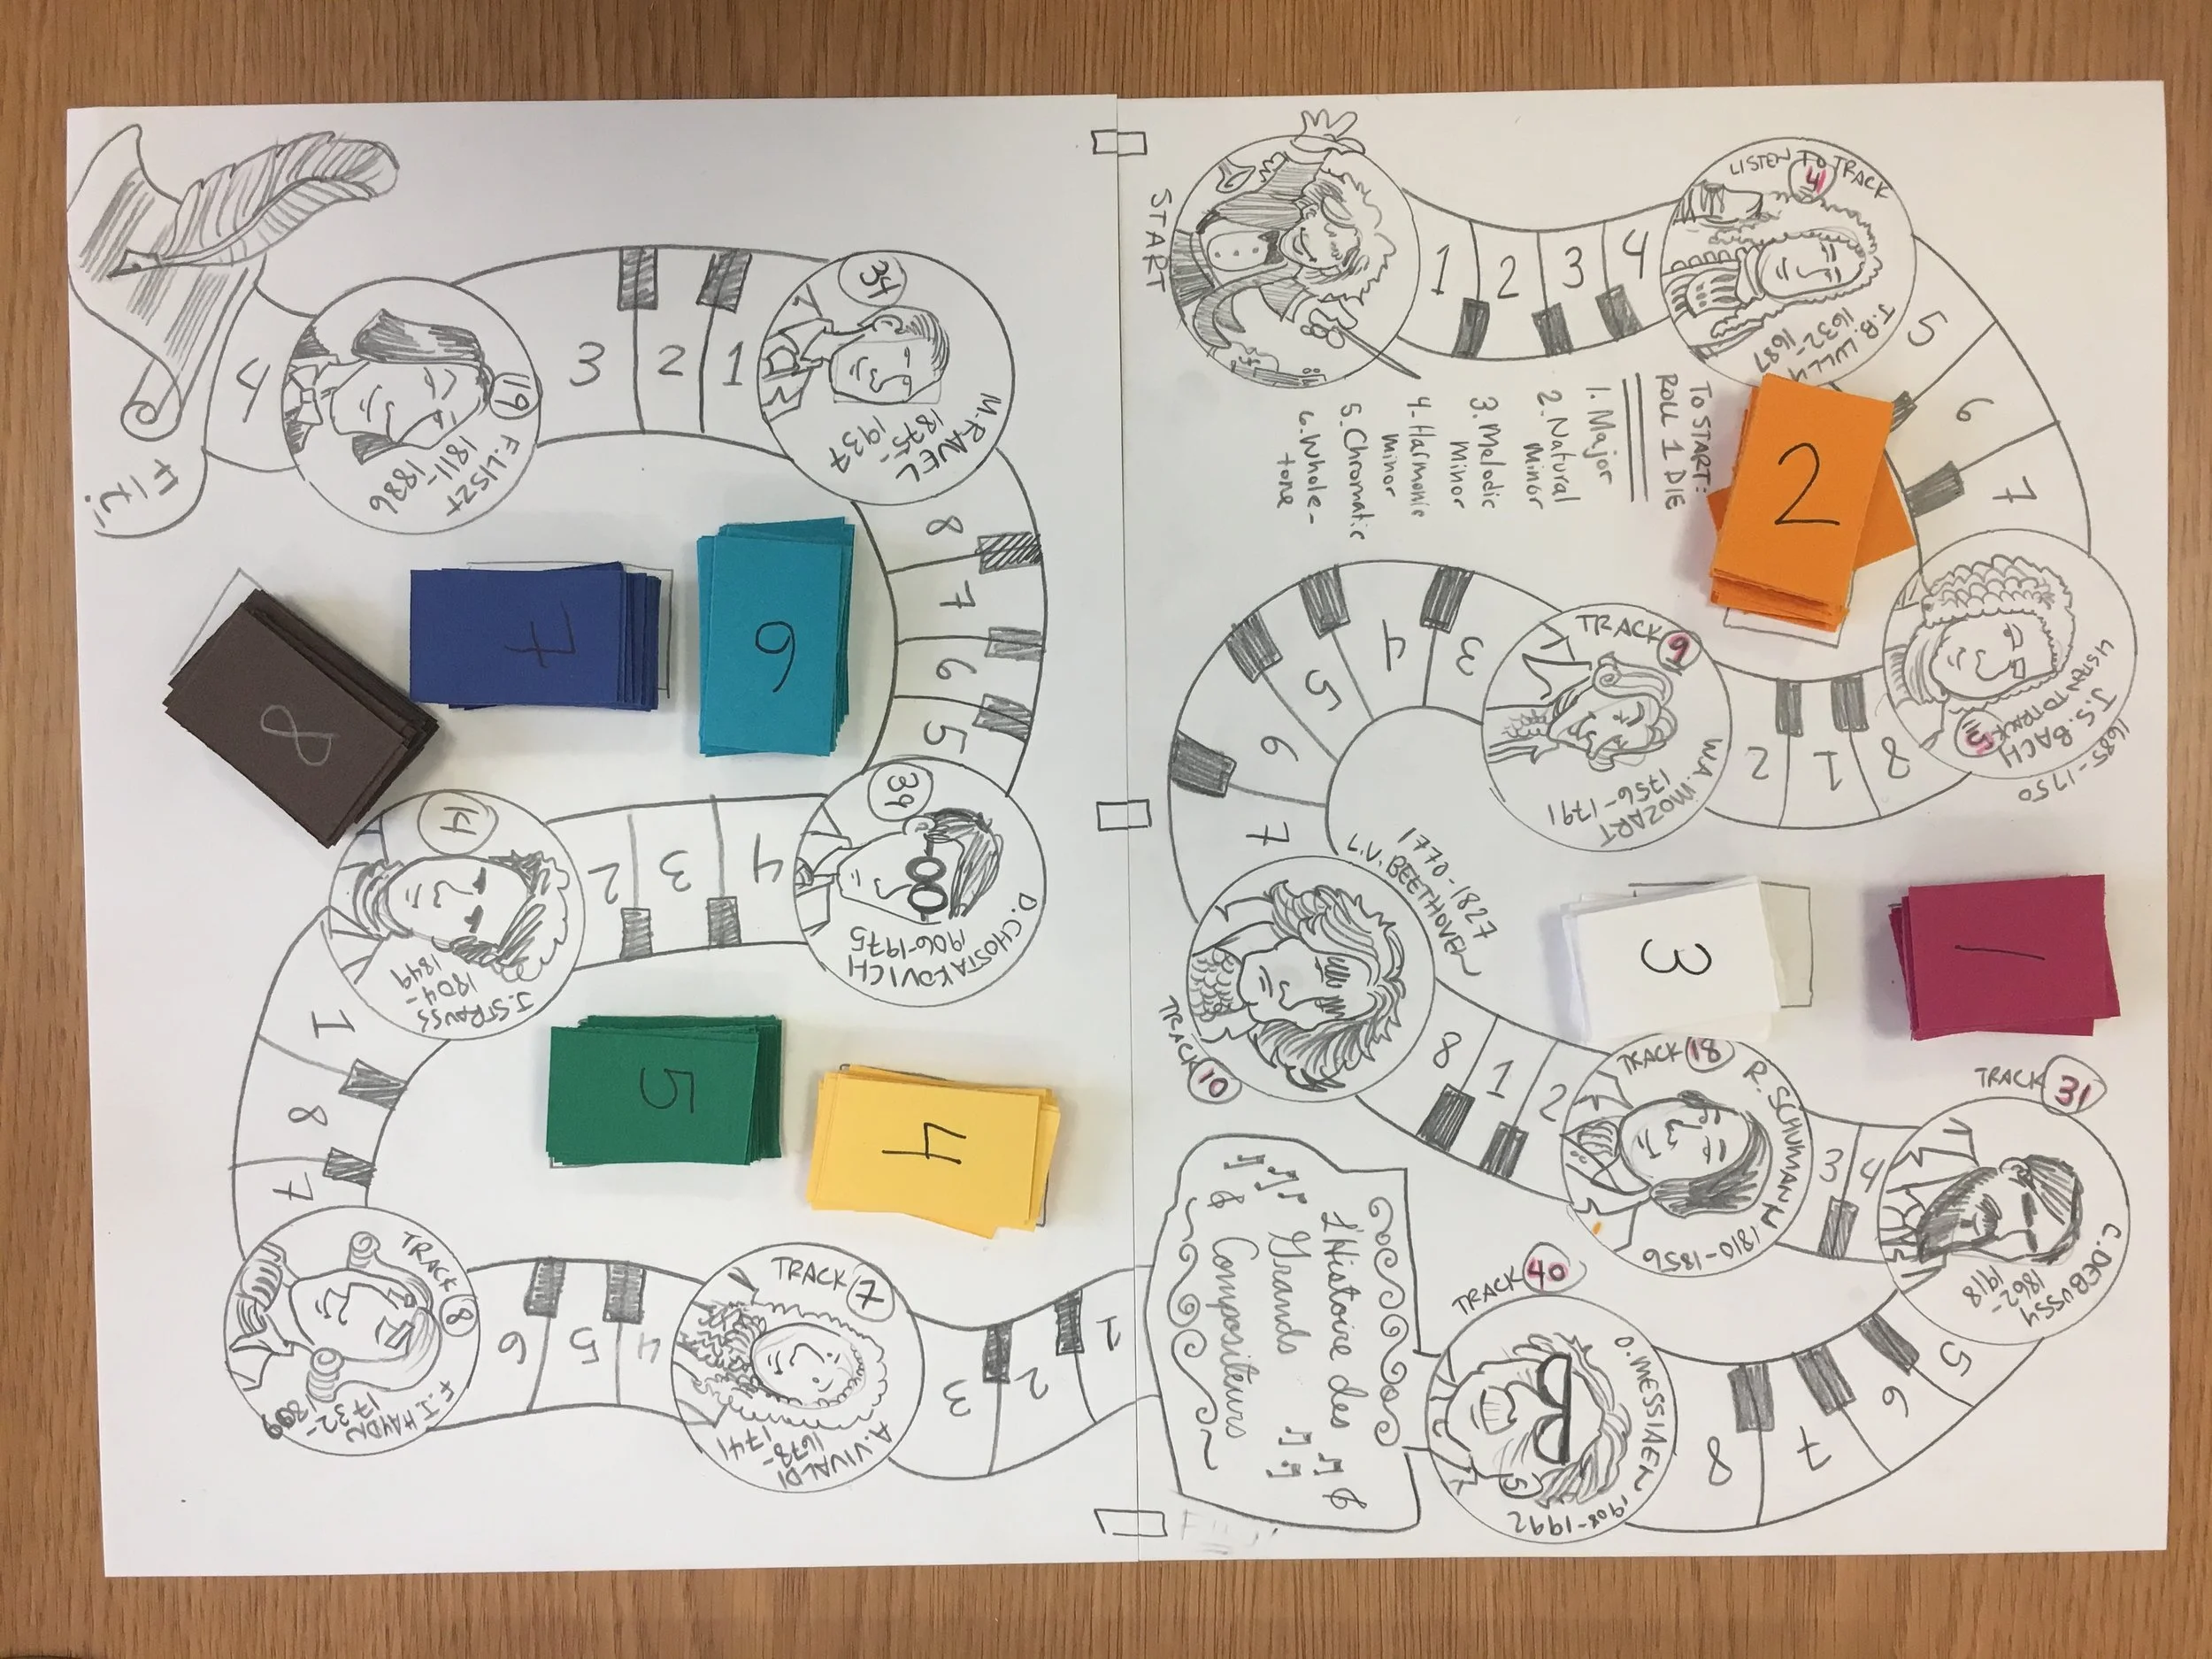
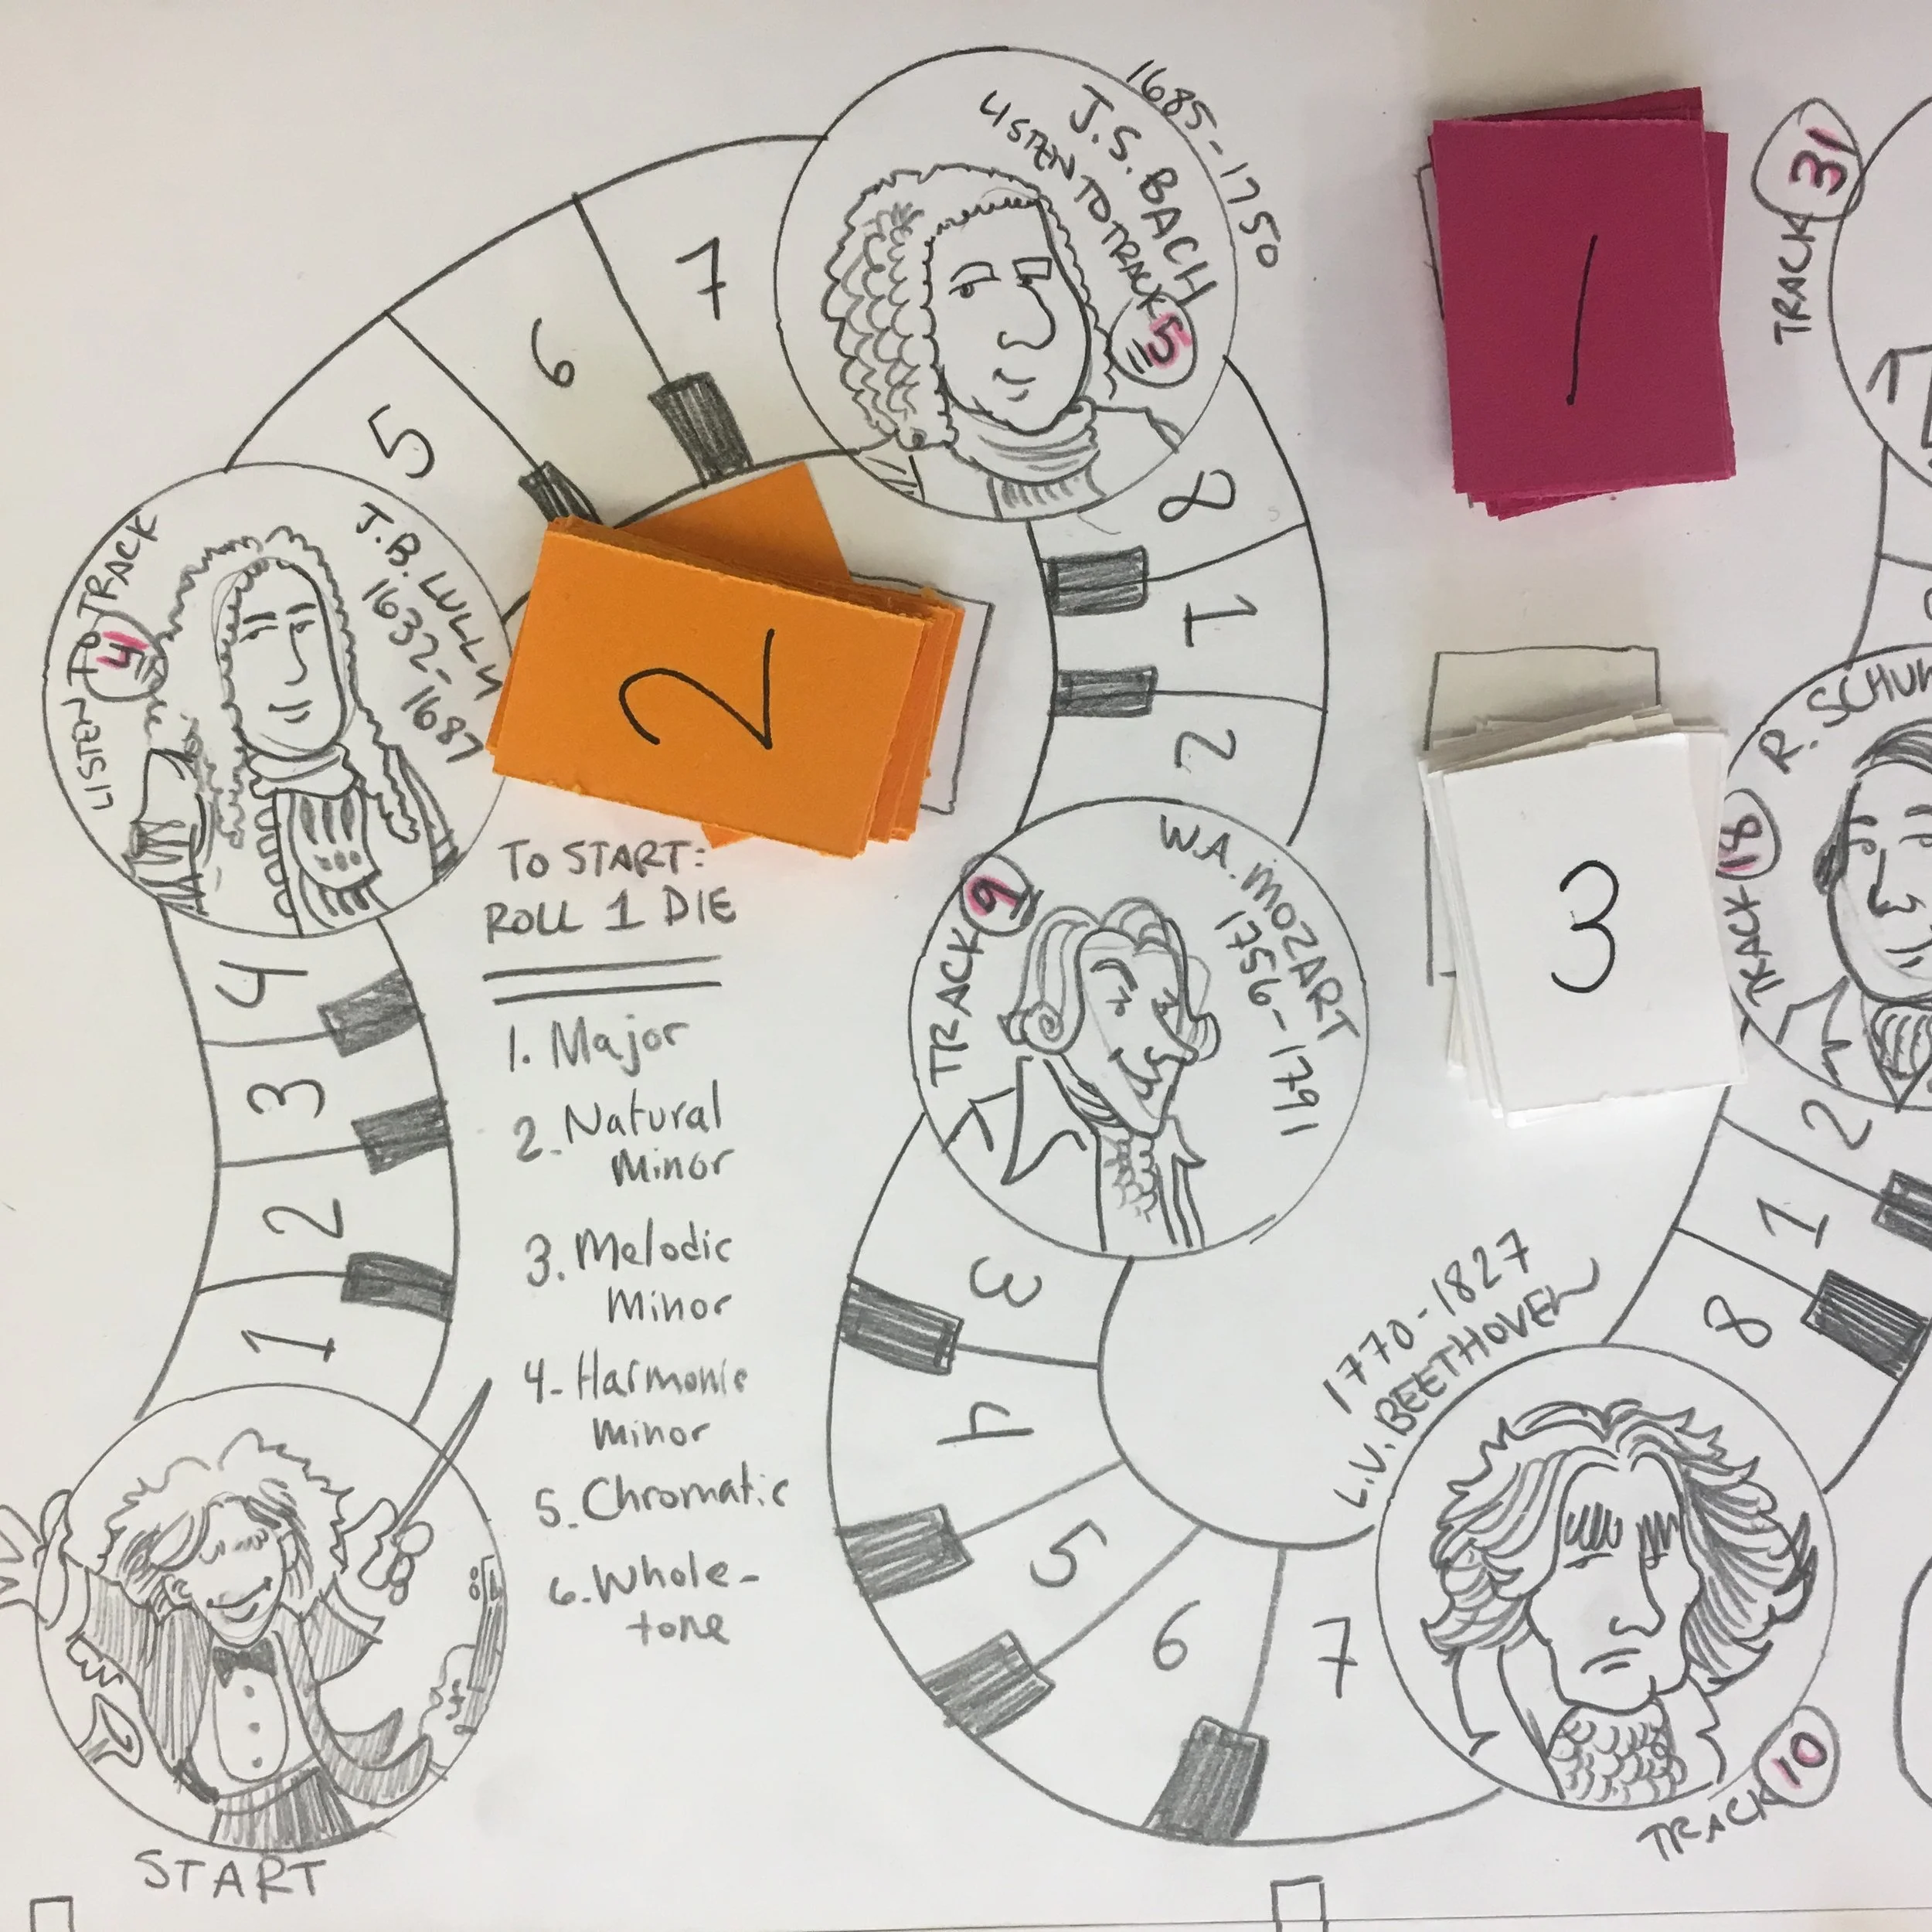
To begin making our game, I drew a long, snaking track of spaces that looked like piano keys. On each piano key I wrote a little number. Every so often I drew circular spaces. In the circles, I drew the name and likeness of a famous composer along with the composer’s birth and death dates. Also in the circular spaces, we wrote the track number of a piece by that composer from a CD that came with a book we have in our library about famous composers.
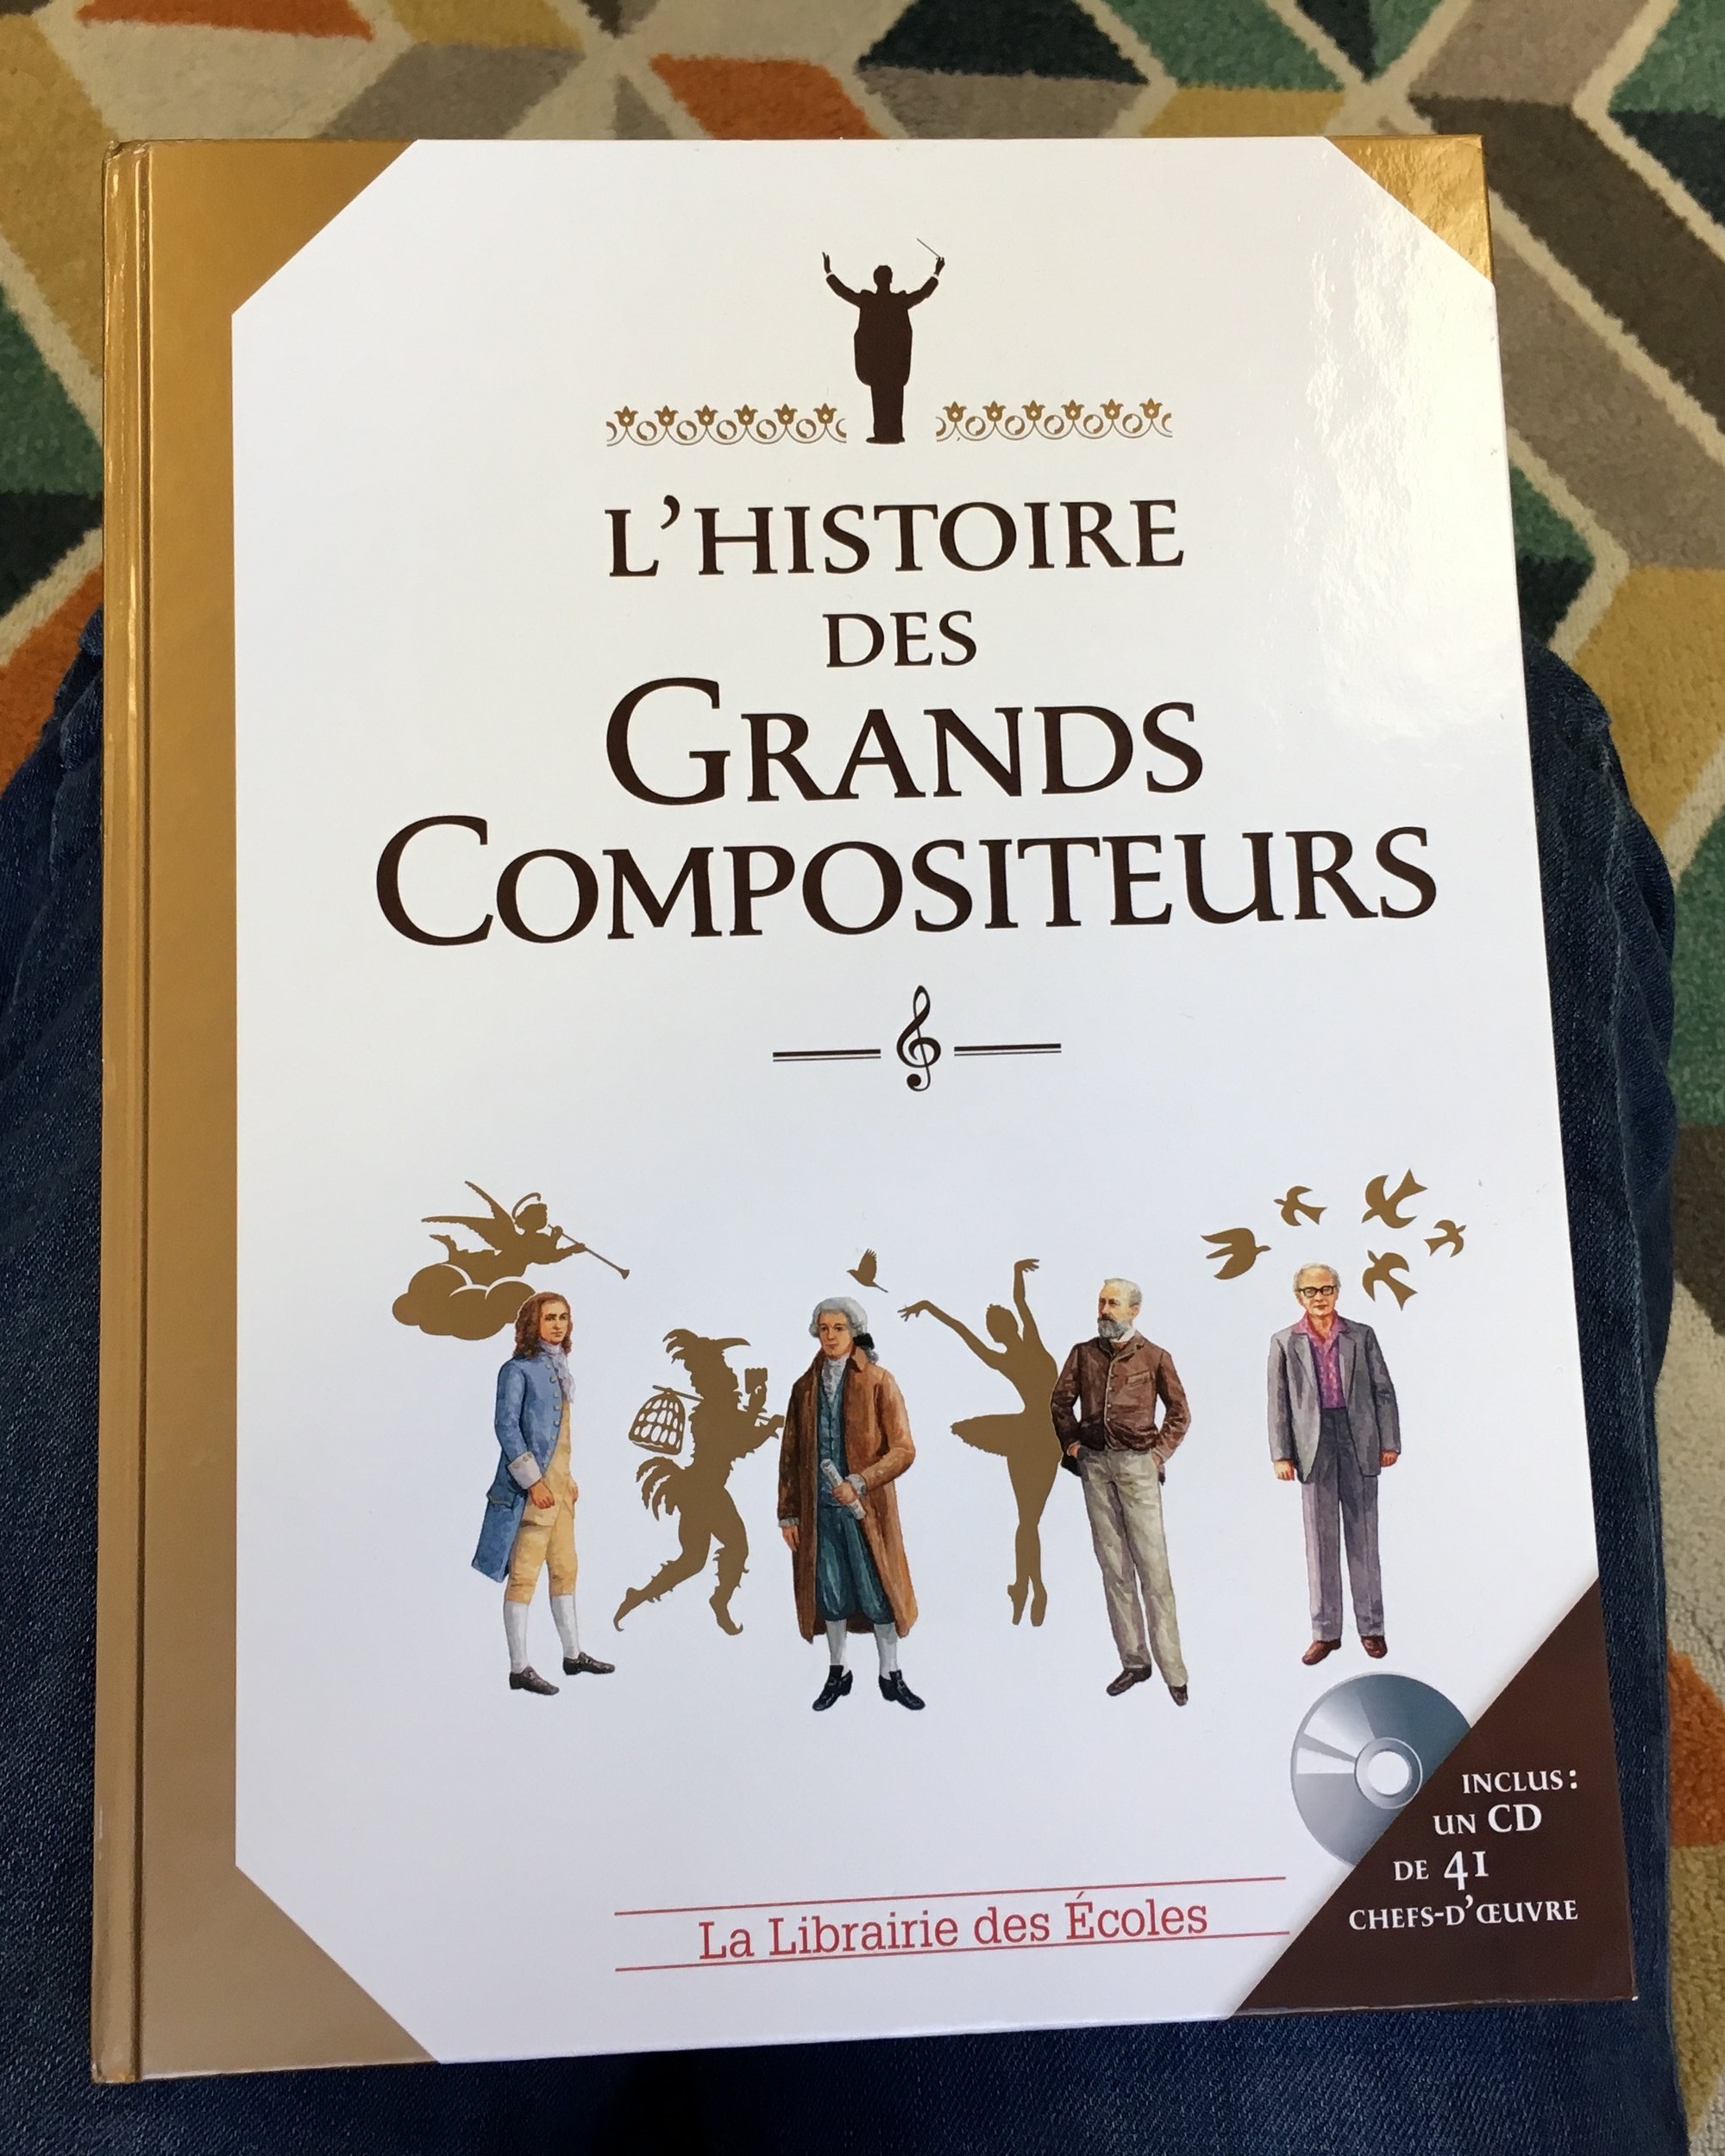
The book we used for the game.
While I was drawing the game board, the children designed small cards. On each colored card they wrote a number from 1 to 8. They then separated the cards into piles by color and number.
The rules of the game were simple. Players take turns. Each player begins by rolling the die and moving the corresponding number of spaces. When the player lands on a piano key with a number on it, he gets to collect a card from the pile of cards with that number on them. If the player lands on a circle space with a composer’s face on it, he plays the indicated track from the CD and everyone listens to the track. On his next turn, the player continues.
The first player to reach the finish space is the winner. To celebrate, when she reaches the finish line, the winner may compose a melody using her collection of numbered cards. To compose a melody, she rolls the dice to determine which scale strip she will use. Then she puts her cards in any order she likes, places her numbered scale strip in front of the tone bars, pulls down the corresponding bars, and plays her melody while the others listen. (You can also play without a “winner” and just have each player play his or her melody when they finish the game.)
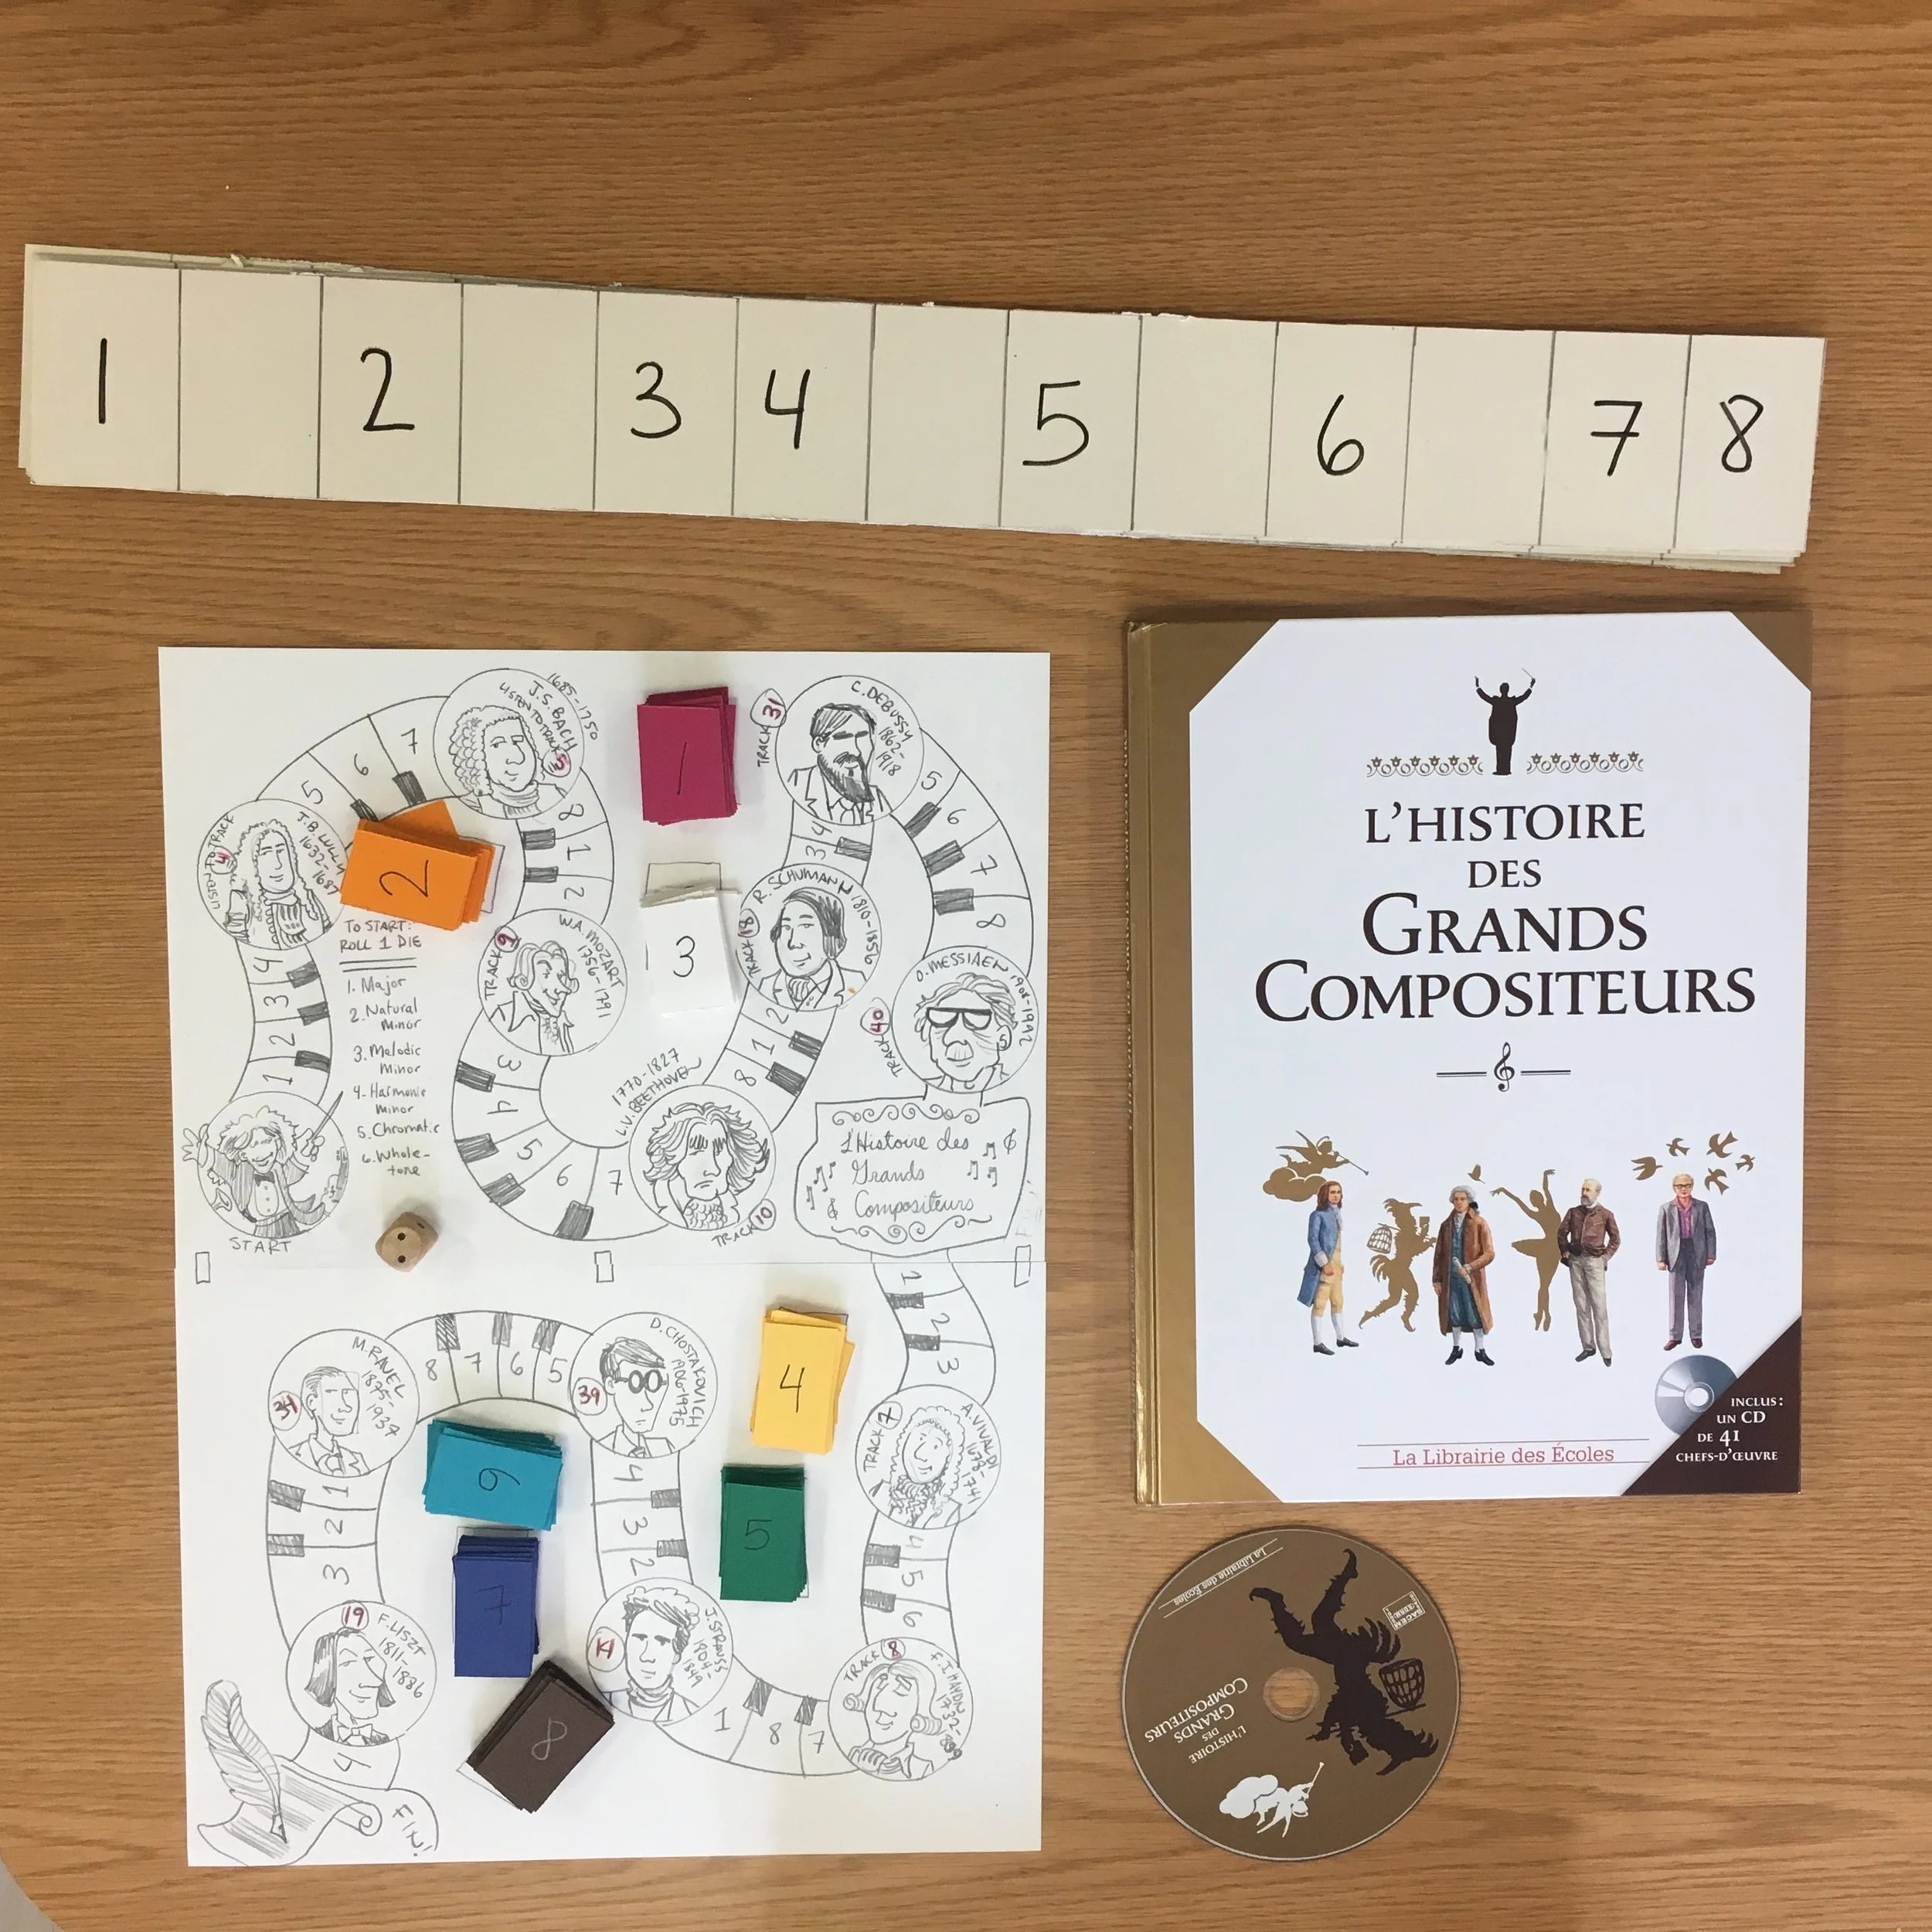
Everything you need for the composer game: game board, colored cards, die, and book with CD. (The tone bars aren’t pictured here.)
Detail of the game board.
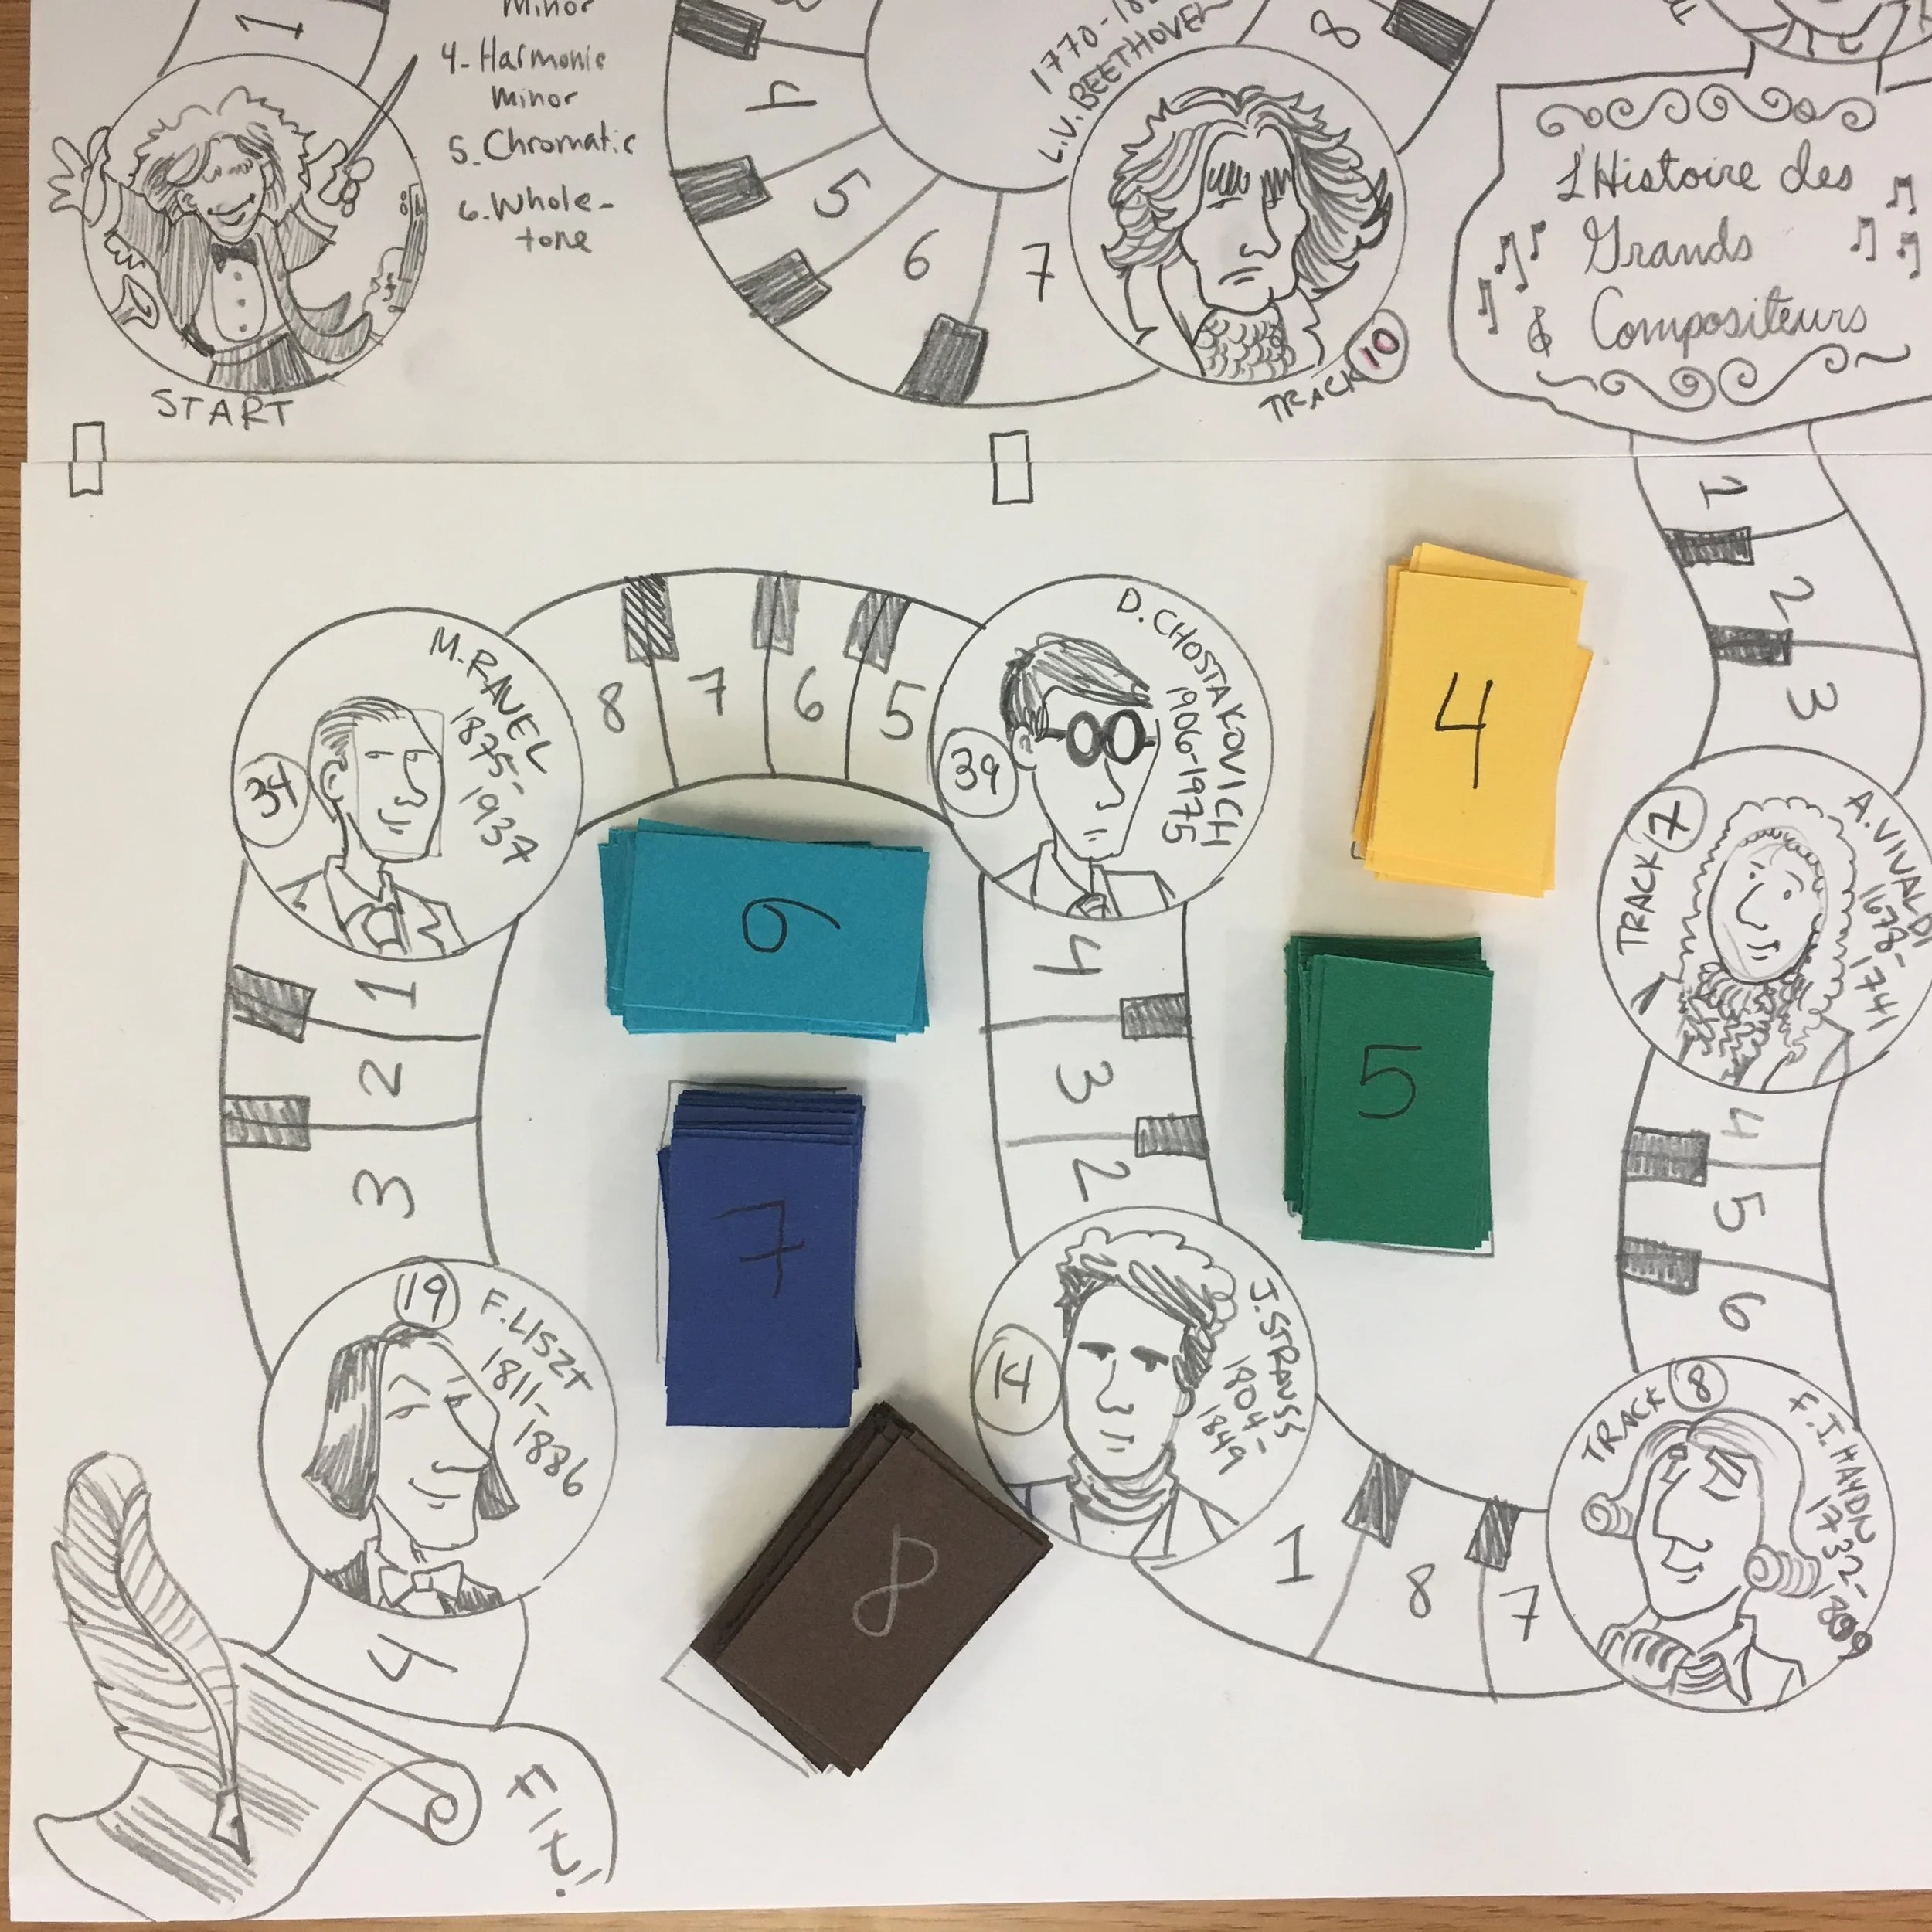
More details
You could play this game with jazz composers, rock bands, or any kind of musicians you like. We had a great time playing this game. I hope you will too.
Feel free to contact me if you have any questions.
Happy music making!
Michael
Making Music in Montessori: the Book!
I just wanted to announce that the book Making Music in Montessori is a go! I've recently signed a publishing contract with Rowman & Littlefield Publishers, who are affiliated with the National Association for Music Educators. I'm working with an editor on the book now. I hope it will see the light of day within the year. I'll keep you posted on all the information.
I hope you are enjoying your music making!
Montessori Music Lessons, Story of the Grand Staff, Tone Bar Sequence
I just wanted to take a moment to offer you a little list of the Montessori music lessons, as given to us by the trainers at the Montessori Institute of Milwaukee. For copyright reasons, I can't give you the full scripts or illustrations. This list does, however, contain summaries of the lessons, as well as a descriptions and a section that clarifies the music theory behind each lesson.
Also, I don't mind passing along this Story of the Grand Staff, which was written by Jennifer Hughes and given to me by another colleague. It's a wonderful Cosmic Story. This PDF comes complete with illustrations.
Finally, I want to offer you a document which contains the entire tone bar sequence. Joe Pounds wrote the document in 2011 and it has been in wide circulation ever since.
Also, you can pay a visit to my friends at the Montessori Commons, who also have a list of the music lessons.
If you have any questions about the lessons, or about any of the musical concepts behind them, feel free to contact me.
Purple light
At the workshop in Paris, I presented a way to turn the old campfire song "Purple Light" into a sound story, with percussion instruments setting the scene for the action in the song.
Click below for a detailed recipe for performing your own sound story with the song. Enjoy!
École Montessori Bilingue: Brie-Compte-Robert, France
In October, 2016 I went to Paris to present a two-day, all-levels workshop in the gorgeous sleepy village of Brie-Compte-Robert. The staff of the school were so welcoming and wonderful to work with. Thanks to the talented staff and teachers of the school.
All in all I presented to about 45 teachers from all over France and Switzerland. We sang songs, played singing games, and learned about the Montessori Bells and Tone bars. Everyone had a good time.
San Rafael Workshop!
Back in August of 2016 I had the distinct pleasure of presenting a two-day, all-levels Making Music in Montessori workshop at the Montessori School de Terra Linda in San Rafael, California.
What a beautiful school. The staff was so dedicated, and all of them proved to be wonderful musicians.